I’ve written about hand flexibility before here on my blog, but it’s an important topic for piano students and teachers, so I thought I’d publish a more in-depth post on this subject. The following article was first published in the most recent edition of Piano Professional, which is the UK piano teachers magazine published by EPTA (European Piano Teachers Association). I hope you find it of interest.
Hands. They are fairly crucial for pianists. Many will immediately refer to the fingers as being the most significant ‘tools’ in a pianist’s tool box. And there’s no doubt, without fingers, playing is rather tricky. But, over the past few months, I’ve been working with a group of students and we have routinely discussed hands; hand positions are always important, but one aspect causing regular issues (and sometimes anxiety too) is the flexibility and ‘softness’ in our hands necessary to move easily, at the same time as retaining finger strength and independence.
Whilst we work ceaselessly to remain ‘free’ and relaxed in our upper torso, even once this has been acquired, some find the muscles in their hands are still inflexible and tense. For me, movement around the keyboard (particularly at the moment of impact i.e. depressing the key) is vital. There’s little point in discussing the finer points of interpretation, musicianship or even dynamic range, if we can’t get around a piece and feel comfortable doing so!
Once our students have assimilated the feeling of freedom in their wrists (the first point of relaxation), arms and upper body, it’s probably time to move onto the hands. When muscles in the hand itself are tense, octave stretches feel challenging, as do large chords and double note passages. Many complain that they find octave stretches and beyond almost impossible. However, I’ve yet to come across a pupil who really can’t play an octave once taught how to relax their hand (small children are an exception).
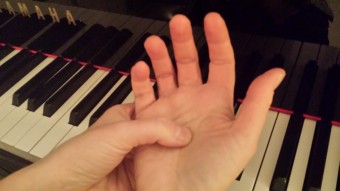
To begin with, our students need to know which part of the hand to relax. Photo 1 illustrates the approximate area to which I’m referring:
Photo 1.
 Photo 1 shows the palm and surrounding areas, especially around the thumb joint; these are normally fleshy and soft when not outstretched or engaged in playing; they need to stay this way as much as possible, as and when a student plays. This does present some challenges, but the main aim is to keep the hand (or the area between the wrist and knuckles) loose and relaxed.
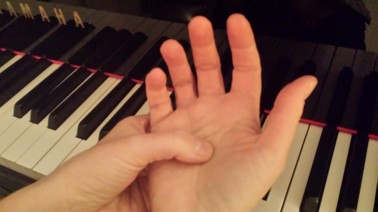
Photo 2.
 Photo 2 illustrates the muscles between the finger joints which also have a tendency to tense.
Here are a few ideas to loosen the hand, helping it to feel less restricted during practice and performance.
Ask pupils to drop their arms down by their side, allowing them to swing loosely, so they can ‘float’ freely from the shoulder (arms should feel ‘heavy’ and weighty as the muscles relax). Once this has been grasped, encourage pupils to lay their hand flat on a surface (away from the piano), palm facing downwards. Slowly open the hand, determining how far it can reach in an outstretched position without feeling tense or uncomfortable at all. To begin with, it might not be that much. However, pupils should note the feeling of the hand when it is still relaxed and ‘loose’. Do this every day for just a minute or so, until it feels natural.
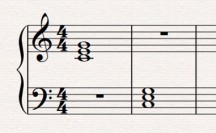
Now ask a pupil to play both chords in Example 1 (first with their right hand, and then the left), and during contact with the keys, with their spare hand (i.e. the hand not playing), feel how the muscles in those fleshy areas of the hand, respond. They might be surprised by how ‘hard’ or rigid each hand appears as the chords are depressed.
Example 1.
 The trick is to learn to relax the hand whilst it’s playing. It’s paramount to know how our arms, wrists and hands feel when engaged. These feelings are easy to block out, as we are generally too busy focusing on the music. This is why exercises or scales can be of value, as they generally have less musical content, allowing us to concentrate on how our upper torso feels in action. When the feeling of flexibility has been digested thoroughly, we will start to assume a comfortable stance whilst playing.
Hand flexibility can be exacting to teach as it requires students to really know themselves and their hands. I constantly work with pupils on this aspect, and find it equally fascinating and rewarding.
A good way to begin is to play a single note (in each hand, separately). As the note is struck, notice how the muscles within the hand react; decide if they are tense or uncomfortable. If they are rigid, as the note is held by the finger, relax the surrounding hand by releasing any tension in the whole arm (students often need help here, both in terms of learning to feel the difference between tension and relaxation, and also learning to hold a note in place whilst relaxing). Clenching the hand (this can be done away from the piano) and then swiftly ‘releasing’ the clench can be one way of explaining the feeling of tension and the subsequent ‘release’ of muscles. We need to be honest and truthful about the physical sensations felt as we play. It can be beneficial to keep returning to the feeling learnt when the hand was outstretched, but was still pliable and felt completely relaxed. By returning to this sensation time and again during practice sessions, it will eventually become a habit.
The following single note pattern, Example 2 (right hand, followed by the left), opens with notes a sixth apart or an interval of a sixth, moving on to an octave (the interval of a seventh could also be used too, before the octave):
Example 2.
 Encourage a student to gently ‘reach’ or rock from one note to the next, with the aim of developing wrist and hand flexibility between notes; there are many ways of doing this, but I ask students to ‘drop’ their wrist after they have played one note, and before they play the next (whilst still keeping notes depressed), allowing a ‘heavy’ relaxed feeling (as the muscles loosen), moving the wrists in a free lateral motion. This motion can be extremely useful, helping students acquire the necessary loose feeling, enabling them to determine the optimum movement needed to release their hand.
Students can check the muscles and tendons in their hand by using the hand that is free i.e. the one not playing, to make sure they feel comfortable and not tight during this exercise. If they don’t feel relaxed, ask them to gradually ‘let go’ of the muscles as they engage their hand. ‘Letting go’ is just another terminology for relaxation or releasing a tight hand. This is the most challenging part. When we learn how to ‘let go’ as we play, at the same time as keeping the fingers in place, the hand starts to release its grip.
Eventually, octave intervals, such as those in Example 2 (second and fourth bar), appear more relaxed and notes can be played together i.e. to form an octave. If we can do this with ease already, as we play an octave, encourage wrists to drop (it’s awkward and uncomfortable to play such intervals with high wrists), and relax (releasing the hand, wrist and arm), whilst still playing the notes. For secure octave finger ‘positions’, the fifth finger needs to be fully functional, and the thumb, light but aiming to keep the shape during movement.
If octaves are played slowly, we can watch and feel the hand as we ‘let go’ or relax in the fleshy area, whilst the fingers depress the keys; the flesh should change from being tense to become softer and more malleable. This type of exercise must ideally be done slowly and painlessly, with much focus on physical movement. After a period of time, it’s interesting to note how the hands adapt, and pupils will be increasingly able to cope with being outstretched and ‘open’ with no discomfort, as is required during octaves and chords.
Once octaves have been negotiated (these exercises should be done little and often, and certainly not for long periods of time), students can move onto adding chords to their ‘flexible hand repertoire’ (inserting inner notes after practising the outer parts alone first), and then working at other types of passage work, including double notes and large leaps.
Hand flexibility takes time, but a positive, valuable way to begin is to become more conscious of hand palpation and movement.
You can read the original article, here:
Hand Flexibility (Issue 46, Spring 2018, pg. 16 – 17)
My Publications:
For much more information about how to practice piano repertoire, take a look at my two-book piano course, Play it again: PIANO (Schott). Covering a huge array of styles and genres, 49 progressive pieces from approximately Grade 1 – 8 level are featured, with at least two pages of practice tips for every piece. A convenient and beneficial course for students of any age, with or without a teacher, and it can also be used alongside piano examination syllabuses too.
You can find out more about my other piano publications and compositions here.
from Melanie Spanswick https://ift.tt/2ERLpPL
No comments:
Post a Comment