Saturday, March 31, 2018

Friday's Post Today or Monday's Post Two Days Ago, However You Wanna Look At It

For many years, racing in Brooklyn's Prospect Park was the mainstay of my cycling diet.  I'd roll out of bed, line up at dawn, and be home with 40 or 50 miles in my legs before the normal people had worked out where to go to brunch.  But then came kids, and a move to the Bronx, and I more or less left the park behind--except when the odd dignitary visited, of course:


Now however I've rediscovered my Inner Fred (he looks like this), and while I've put in a couple races in Central Park this season, today marked the first time I've raced a bike in Prospect Park since, as far as I can tall, March 2012--which I think may also have been the first time I raced the Ritte Rust Bucket, which looked like this at the time:


What a difference six years make:


Actually, they don't make that much of a difference, it's just a little rustier, just like its owner.

Anyway, my return to Prospect Park was something of a homecoming, and so I arrived in style astride my obnoxious Masters bike:


(The Renovo, but not from the race)

I'm pleased to report I rode a tactically perfect race, by which I mean I never stuck my nose in the wind and basically managed to spend all twelve laps hiding in the pack like a shy toddler behind a parent's legs.  Consequently I delivered a solid pass, which instilled in me a sense of accomplishment that even the promoter's post-race lecture about how slow my field had been riding could not diminish.  (I was in the 40+ field and I guess the 2/3 field, which started right before us, put like eight minutes into us.)  Also undiminished was my deep appreciation of the Renovo as a race bike--except for the damn placement of that single water bottle, which continues to irritate me.  Even so, I must profess my love this exotic and quirky bicycle, and as I rode I fantasized about having Renovo build me the perfect park racing bike.  Basically, it would be the Aerowood but with a second bottle cage mount, as well as a couple of features taking advantage of the unique properties of wood, these being:

  • A little compartment with a hinged door on the top tube for storing spent gel packets (the hinges would be engineered to creak for that rustic feel);
  • A cuckoo clock integrated into the headtube that strikes when I hit my max heart rate.

In the meantime, since I've been enjoying this bike so much I was curious if any other semi- or even full-blown professional bike bloggers had reviewed it, so I recently consulted a popular search engine to find out.  As far as I can tell nobody has, and what few write-ups there were seemed to be based on press releases, such as this one.  Sadly this means I have nobody to compare notes with--except for the commenters of course:

It's quite a lot more relaxed than any of those bikes. It makes a Synapse look like a time trialist's dream. It goes so far beyond not-a-race-bike geo that the set of recreational riders it would suit will mostly consist of the grossly fat and chronically unfit. At that level aero really is a moot point.

I love the idea that a couple millimeters or degrees here or there is all it takes to render a bike completely unraceable.  "Wait, 43mm of fork rake?  That's an endurance bike, you can't race that!"  Certainly having ridden the bike for nearly six months I can confidently say John doesn't know what the fuck he's talking about--though admittedly the "chronically unfit" comment does land pretty close to home.

Finally, as I immerse myself in Fred-dom there's one other thing that's won me over, and it's crabon wheels, but not for the reasons you'd expect.  See, for years my first cue that a crash was imminent would be the unmistakable crunching sound of a Fredly collision, at which point I'd scan the pack for falling bodies and employ evasive tactics.  Now that crabon wheels are pervasive however it's the screeching of brakes and--more importantly--the smell of hot cork pads as some Fred grabs a fistful of brake that alerts me to danger.  By the same logic I'd also suggest that disc brakes are indeed dangerous in mass start road races--not because the rotors might cut your limbs off, but because you can't really smell the damn things.  As it is, between the hair-raising sound and the smoldering stench, clearly crabon wheels with rim brakes act as a crucial early warning system.

I'd say they that USA Cycling should make them mandatory, but marketing has pretty much accomplished that already.


from Bike Snob NYC https://ift.tt/2J9MiGL

The Masters: Articles Roundup

The Masters Articles Roundup As the Masters approaches, here is a list of articles that ... Read more.

The post The Masters: Articles Roundup appeared first on GolfBlogger Golf Blog.


from GolfBlogger Golf Blog https://ift.tt/2GntdD3

Final Round Broadcasts Of The Masters On YouTube

Final Round Broadcasts Of The Masters On YouTube If you can’t get enough of Augusta ... Read more.

The post Final Round Broadcasts Of The Masters On YouTube appeared first on GolfBlogger Golf Blog.


from GolfBlogger Golf Blog https://ift.tt/2GIb7ef

The Masters By The Numbers 2018

Source: WalletHub

The post The Masters By The Numbers 2018 appeared first on GolfBlogger Golf Blog.


from GolfBlogger Golf Blog https://ift.tt/2J8Xq6G

A New Exam Syllabus for Stringbabies

Kay Tucker is founder and director of Stringbabies; a programme enabling young children to learn stringed instruments. I met Kay (pictured below) several years ago and it has been inspiring to observe her continued success, establishing an ever-growing network of teachers and students who are using this increasingly popular programme. Kay has kindly written the following guest post (for my new series), focusing on Stringbabies’ new association with Victoria College Examinations. Over to Kay…


A few years ago I saw a documentary about the well-loved characters Wallace and Gromit, in which their creator, Nick Park, was interviewed. He said that he felt as if the characters he had molded with his own hands had already been in existence and were just waiting to be introduced. I can totally concur with that view. After fourteen years since I first put the Stringbabies ideas down on paper, I find it hard to believe that It started life within my own mind, as it has such a life of its own and like all babies, its ongoing life journey is proving interesting.

Eighteen months ago, I was exhibiting the Stringbabies books at the Music Education Expo in London, thanks to the generous support of the Soundpost Ltd. whilst there, I was approached by the Chief Executive of Victoria College Exams (VCM) and asked if our two organizations might explore ways of working together.

On following this contact up, I was delighted to discover that the team at the exam board had already decided to propose a bespoke qualification for Stringbabies students!

Over the following twelve months I had great fun dreaming up a syllabus and award structure. As composition and sight reading are important components in Stringbabies, I felt that they must form the pillars of any syllabus devised.

Eventually I had a draft of a three-tier award, starting with the first level, which is aimed at the student who has  the most basic grasp of Stringbabies notation and is just beginning to play open strings with controlled bowing.  At level one, the candidate is expected to perform three pieces, two of which are basic first Stringbabies repertoire, and the third being their own composition of no more than sixteen beats using a single line of Stringbabies notation.

As left hand skills may have not been introduced at his stage, the technique and scales requirement is for the candidate to compose a rhythm of no more than six beats and then play it on two strings of their choice. There are simple aural and sight reading tests using Stringbabies notation.

By the intermediate stage (level two) the student will be acquiring some skills in the left hand and  the choice of Stringbabies repertoire reflects this; a composition of no more than 30 seconds duration acts as a third piece, and the sight reading and scales similarly reflect the developing technique.

Level three is the final stage of the Stringbabies award and at this stage a piece is chosen from the advanced Stringbabies repertoire and also a piece in conventional notation chosen from a list of music drawn from well-known beginners’ repertoire. The third piece is as before, a composition provided by the candidate in either conventional or Stringbabies notation. A full one octave scale is required in two keys using a rhythm also composed by the candidate. Two pieces of sight reading are given; one in Stringbabies notation and the other in conventional notation, reflecting the fact that at this stage the student is moving on to reading conventional notes.

Before releasing the syllabus to the public, Stringbabies teaching colleagues were consulted about components of the award and of course the staff at Victoria College Exams had their own input.

It was decided that the awards should be assessed by the teacher, who in turn would be moderated once a term by the exam board. This means that applications can be made at any time of the year and that assessments can take place in lesson time, ruling out the need to travel to an examinations centre. In order to be moderated, the teacher submits a recording of the pupil performing on any device which produces a simple and clear recording. For my first Stringbabies award entrants, I used my mobile phone to record and also to take photos of their compositions.

It was a surreal experience when the first Stringbabies Award certificates arrived and it still seems improbable. How many people have the privilege of seeing a system they have developed being accredited by an examinations body?

It was another landmark moment when VCM notified me of the fact that entries had been submitted by another teacher in a different part of the U.K.

Rolling out the VCM Stringbabies award is still ongoing and it has been wonderful to have a good deal of support in the press and especially from Dame Evelyn Glennie, who kindly passed on the news via her social media accounts.

Another significant development this year is Stringbabies going online! We now have a partnership with Charanga to publish the violin and cello books on their music educational platform and it is hoped that this will be up and running by the end of the year.

As I mentioned earlier, Stringbabies seems to have a life all of its own, so I really have not a clue what is going to happen next but if it continues to have a positive impact on enabling people of all ages to comprehend and engage with music, I, for one, will be content.

For more information on the Stringbabies award please visit www.vcmexams.com and you can find out more about Stringbabies at www.stringbabies.com


My Publications:

For much more information about how to practice piano repertoire, take a look at my two-book piano course, Play it again: PIANO (Schott). Covering a huge array of styles and genres, 49 progressive pieces from approximately Grade 1 – 8 level are featured, with at least two pages of practice tips for every piece. A convenient and beneficial course for students of any age, with or without a teacher, and it can also be used alongside piano examination syllabuses too.

You can find out more about my other piano publications and compositions here.


from Melanie Spanswick https://ift.tt/2GovIks

Friday, March 30, 2018

Schupan Recycling Returns As LPGA Volvik Championship Sustainability Partner

Schupan Recycling Returns As LPGA Volvik Championship Sustainability Partner Schupan SustainAbility™, a division of Schupan ... Read more.

The post Schupan Recycling Returns As LPGA Volvik Championship Sustainability Partner appeared first on GolfBlogger Golf Blog.


from GolfBlogger Golf Blog https://ift.tt/2Gkjc9U

Splurging on the Right Things in Tokyo

On my first trip to Japan in 2013, I completely fell in love with the country — but I couldn’t have named a favorite city. I deemed Japan far greater than the sum of its parts.

That may still be true — but this time, I have a favorite. Tokyo, I love you so much.

I’m about to say something a bit taboo in the travel blogging community: you can have fun in Japan on a backpacking budget, but it’s so much better with more financial wiggle room. You don’t have to live lavishly — the only expensive thing I did was the Park Hyatt Tokyo, and that was only the last two nights. Most of what I did was a mid-range trip, taking into mind that Tokyo is an expensive city with prices similar to New York, London, and Paris.

Mid-range travel in Tokyo means you need to take the subway most of the time, but you can afford an occasional cab ride when you arrive late and are too tired to walk 25 minutes to your accommodation. It means you might not be able to get a $300 kaiseki meal, but you can definitely afford $60 Michelin-starred yakitori. It means you can pay for a fun food tour instead of trying to figure out incomprehensible Japanese food stands on your own. It means you can splurge on cute Japanese baby stuff for your expectant friends.

This was the second part of my campaign with ANA — All Nippon Airways to promote Japan’s only five-star airline. For the first part of the trip, I visited the northern island of Hokkaido. While ANA covered only my first three days in Tokyo, I’m including all the experiences I enjoyed in my final two days in Tokyo as well.

The Language of Big Cities

It takes a bit of an adjustment period to get used to Japan, even if you’ve been before. Japan is just so different from every other place in the world. When arriving in Sapporo, I was struck by how long it took me to find an ATM, buy a ticket for the train, figure out which way was out of the train station — even if I knew to make a beeline to the nearest convenience store for some onigiri before passing out in my hotel at 9:30 PM.

Tokyo is different, though. Japan may have its own language and culture and way of doing things, but so do big cities. It’s hard to tell whether Tokyo is more of a Japanese place or more of a big city.

I’m a girl who loves her megacities. I live in New York and some of my favorite cities around the world include the giant metropolises of Paris, Bangkok, Berlin, and Hong Kong. Big cities prioritize speed and anonymity. People give each other space on an individual basis, and in groups, they swoop past each other like schools of fish. The language of a megacity is a language understood throughout the world, and in some ways, Madrid and Seoul are less foreign to me than small town America.

This time was all about getting swept up in the megacity that is Tokyo. Here are the activities I enjoyed the most.

Personal Shopping in Ginza

I think one reason why I loved Tokyo so much this time is because I found my favorite neighborhood — Ginza. Ginza is my zone. It’s famous for being the upscale shopping neighborhood of Tokyo. I was surprised how quickly Ginza became the center of my trip — I couldn’t stop returning!

On Airbnb I found a personal shopping tour in Ginza — you join a professional stylist and he takes you to cool shops, showing you interesting Japanese brands. It ended up being just me and a girl named Nisha from Canada, and our stylist-guide Hiro took us on a fashion journey through the coolest spots! We ogled Japanese sportswear in the Ginza Six complex, admired Comme des Garçons duds at another mall (I was afraid to breathe on them), and Hiro took us to some more moderately priced department stores.

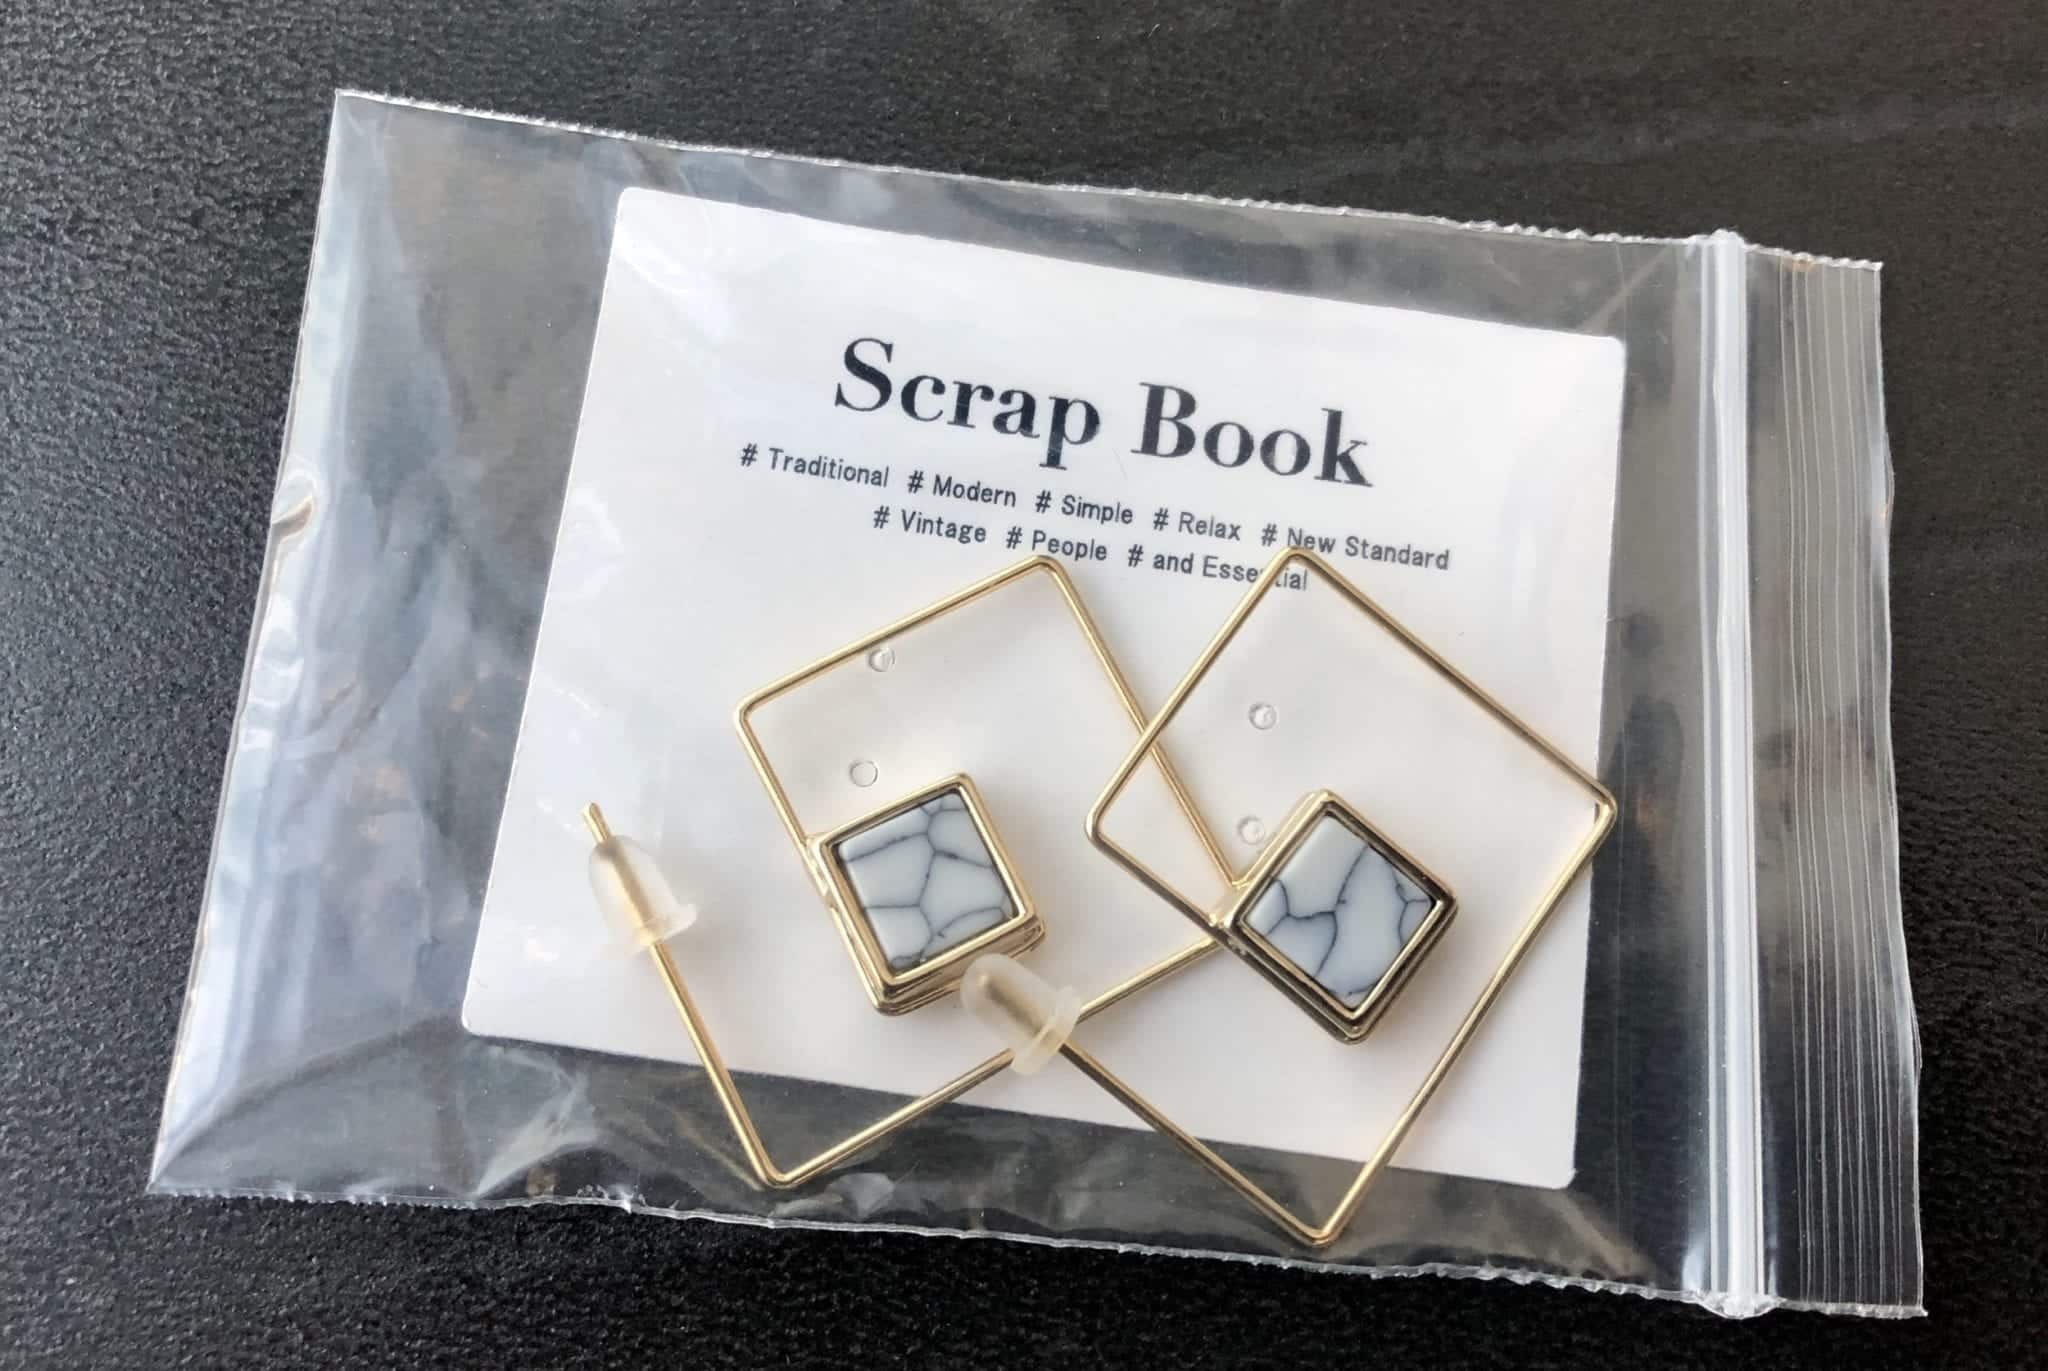
I spotted these earrings and had to buy them. Aren’t they cute?

We finished with a coffee and a chat about our respective homes. Hiro even asked us for input in marketing his other tour, a streetwear tour of Shinjuku. (“What neighborhood is more famous to North Americans, Shinjuku or Harajuku?” he asked. “Definitely Harajuku!” Nisha and I said in unison. “Really!” he exclaimed in surprise.)

Ginza is a fantastic place to explore and I especially loved the department stores. If you go, Tokyu Plaza was my favorite department store for stuff I would actually buy (mid-ranged goods and cute only-in-Japan brands), while Mitsukoshi was my favorite department store for gawking at expensive stuff, as well as its fancy food hall in the basement. Ginza Six is mostly home to expensive brands but it has a cool interior and is well worth a stop as well.

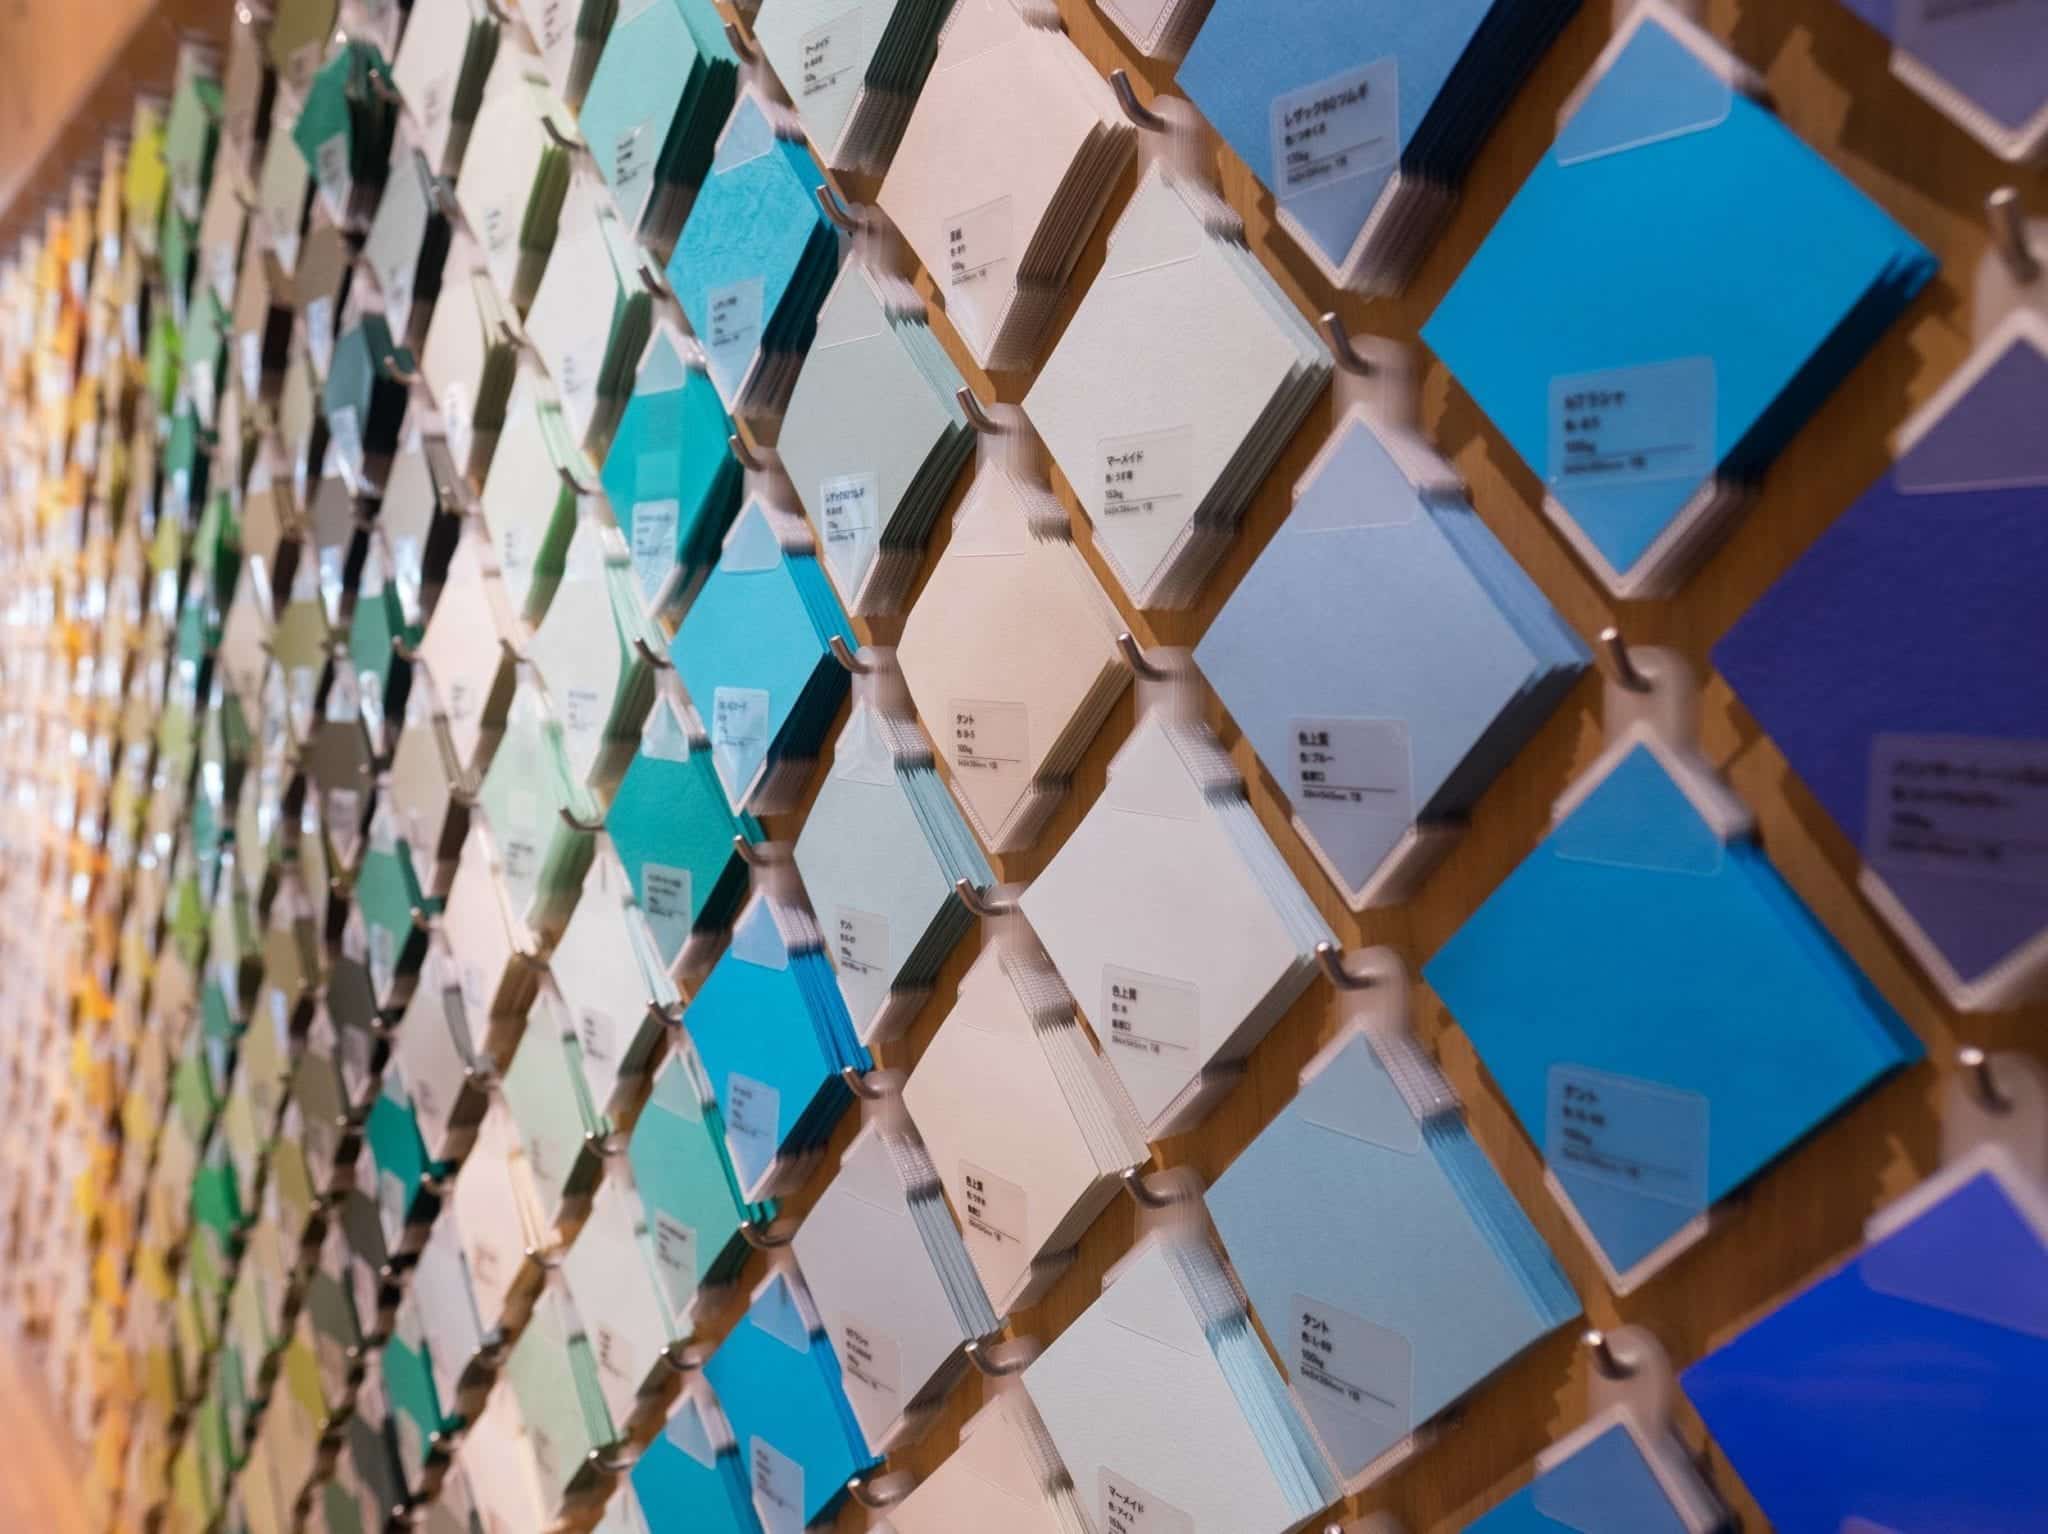
My favorite store of all was Itoya — a world-famous stationery store. Like many stores in Ginza, it’s tall and skinny with many floors — and in this case, it’s 12 floors of beautiful handmade paper goods! I felt blissed out just looking at the different colors of washi paper.

Keep in mind that if you spend more than 5,000 yen ($50) at any one store in Japan, you’re entitled to a tax refund.
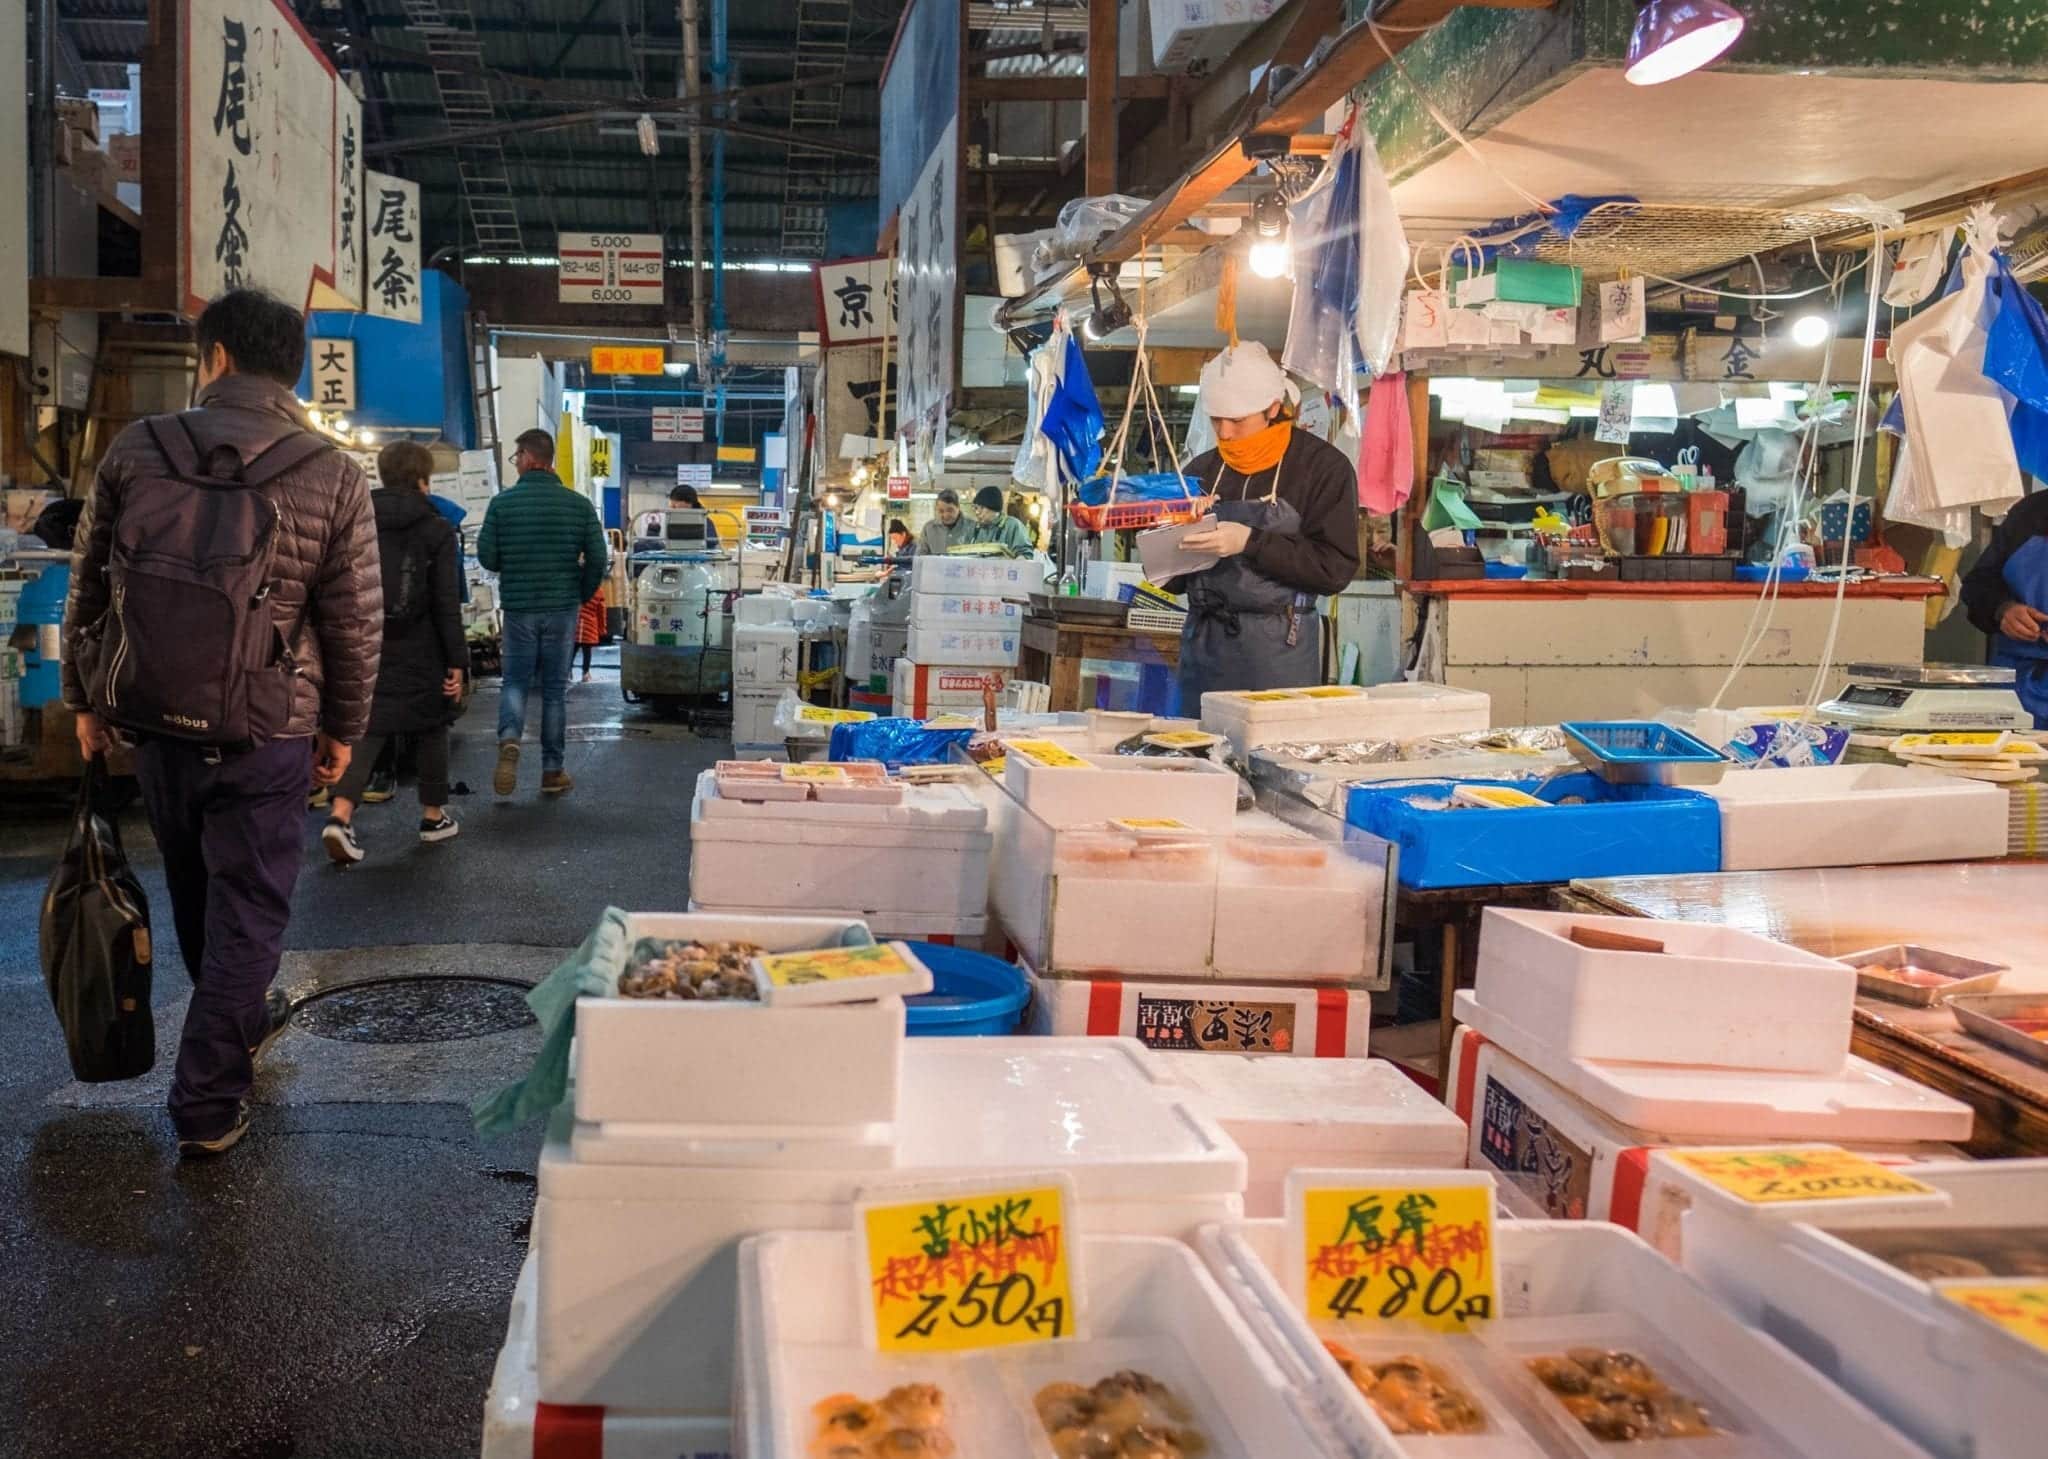
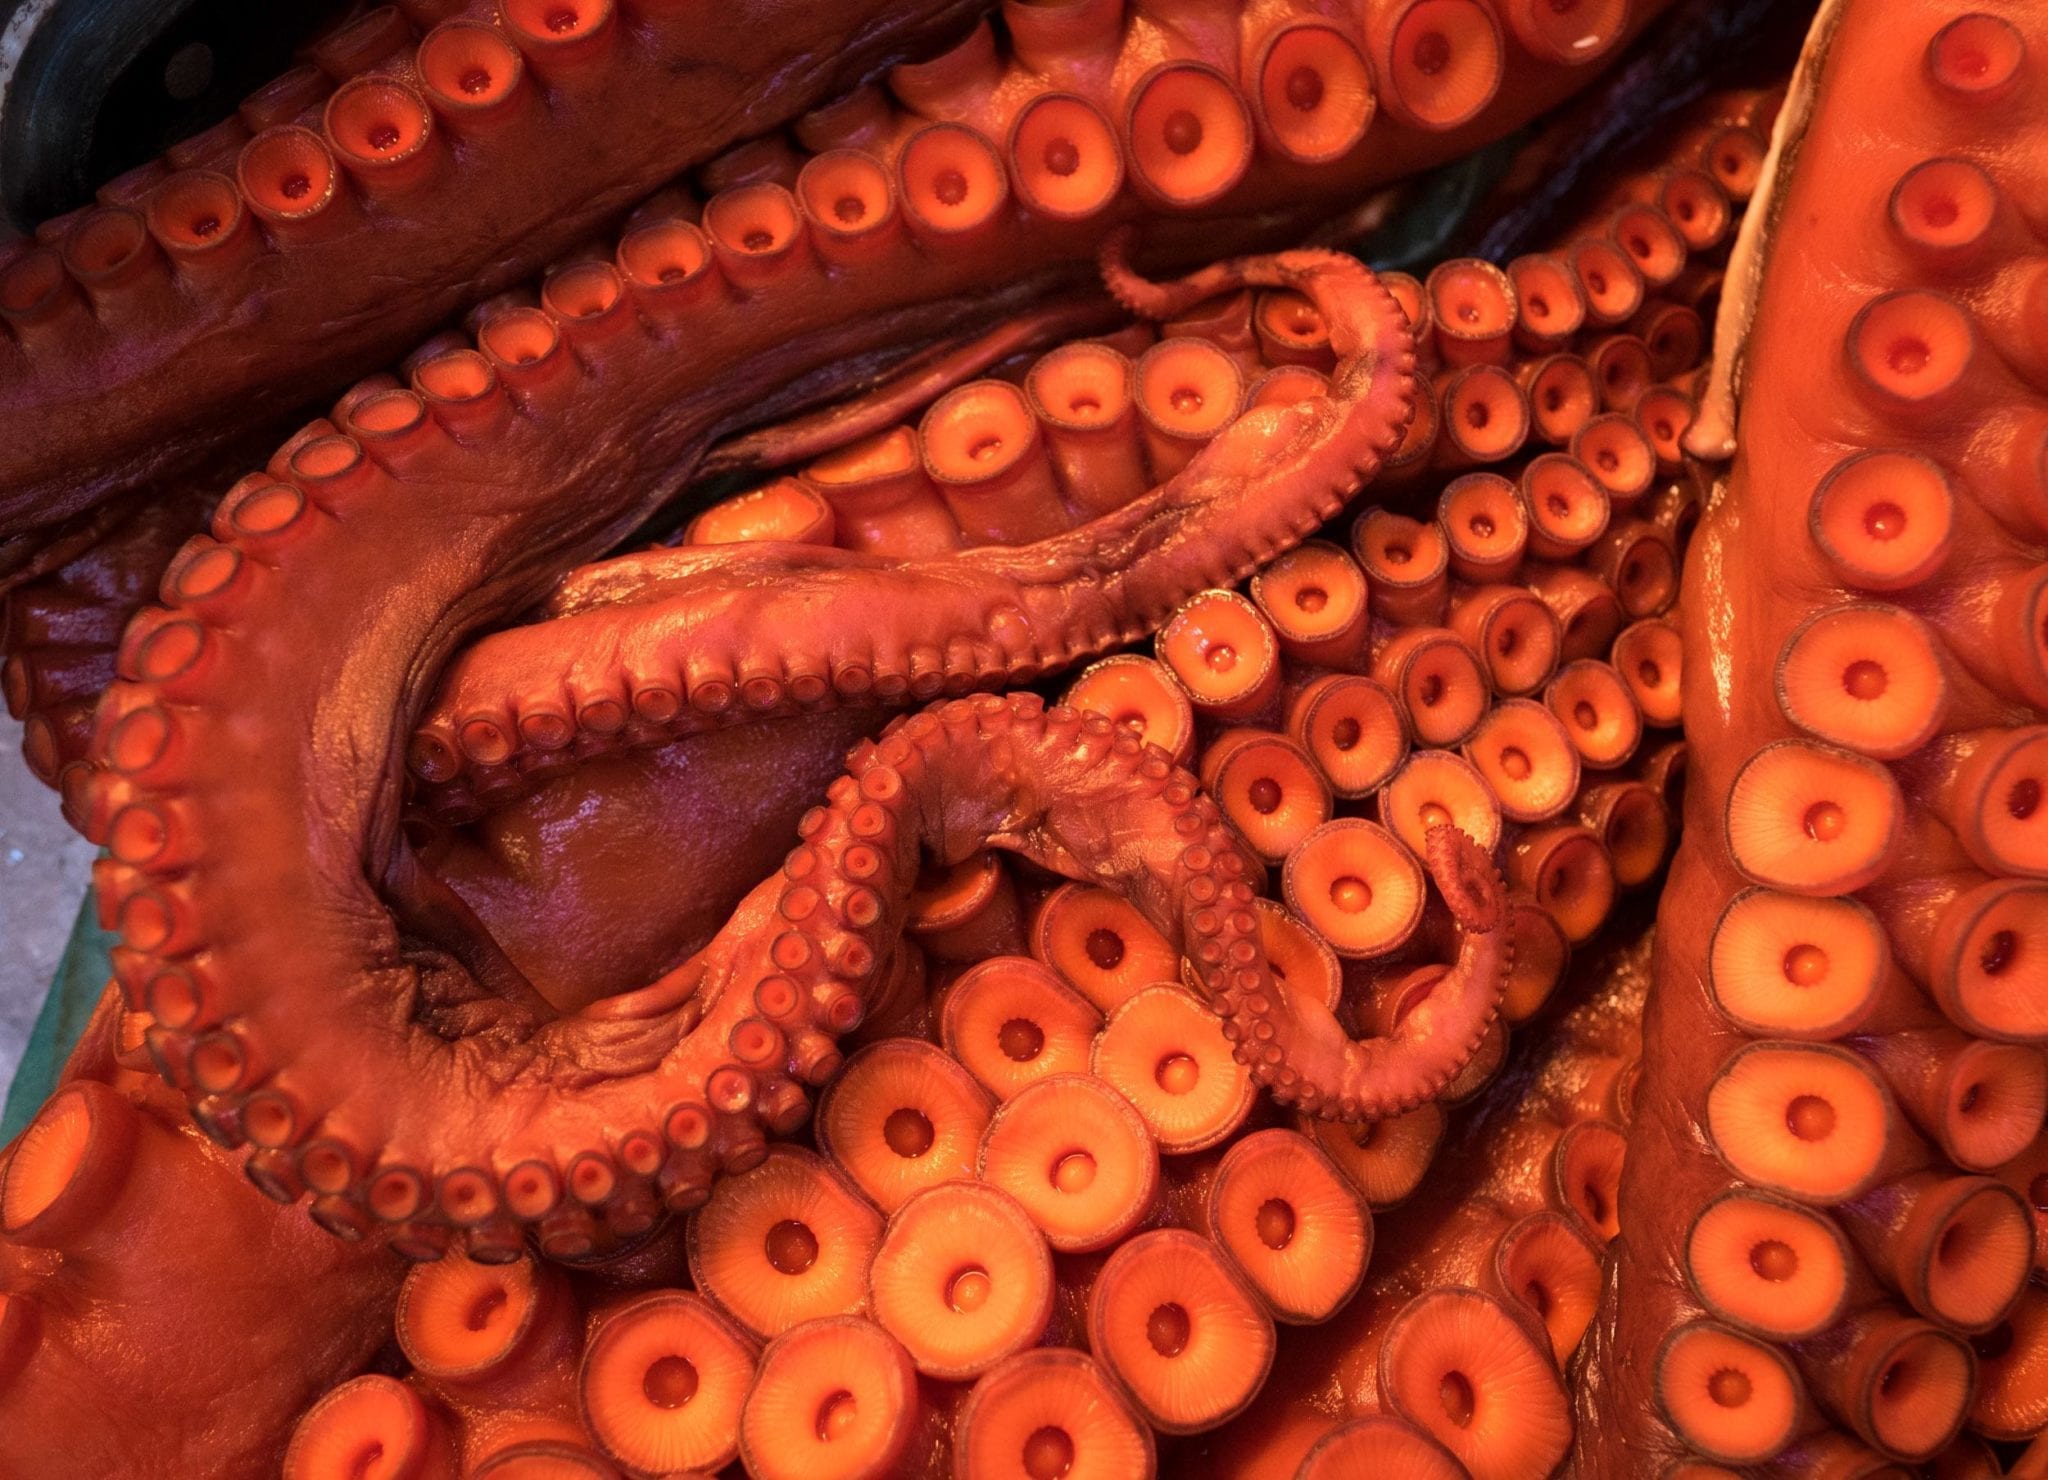
Tsukiji Fish Market

Tsukiji Fish Market is arguably one of the most touristy activities in Japan — but only for now, as the market is planning to move locations in October 2018. I Googled around and booked a tour of the market with Ninja Food Tours.

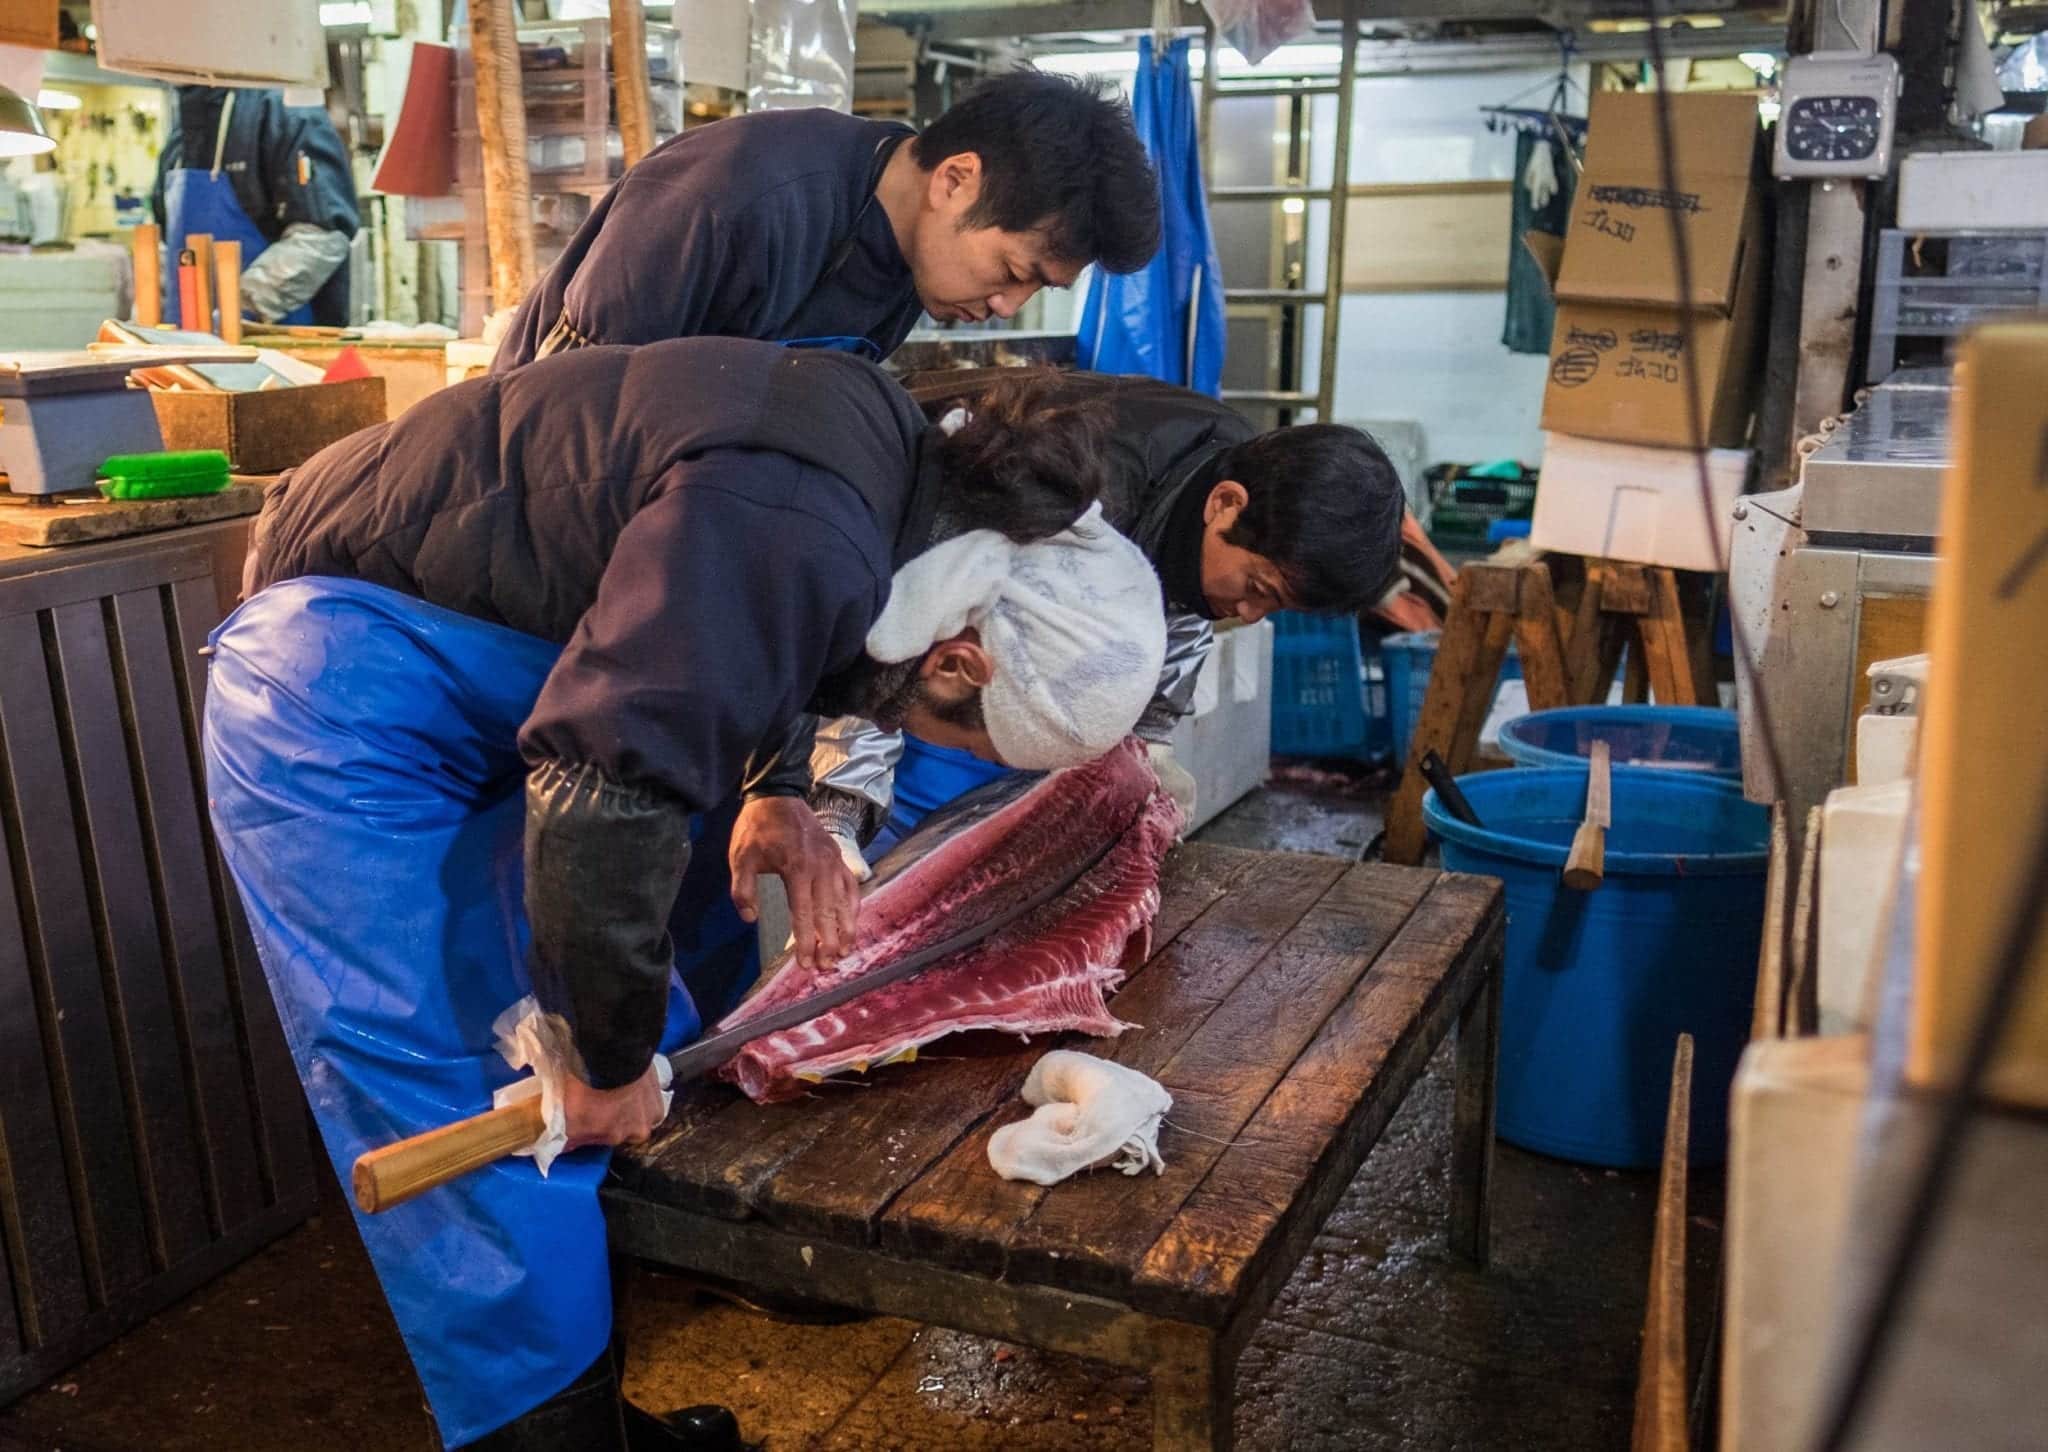
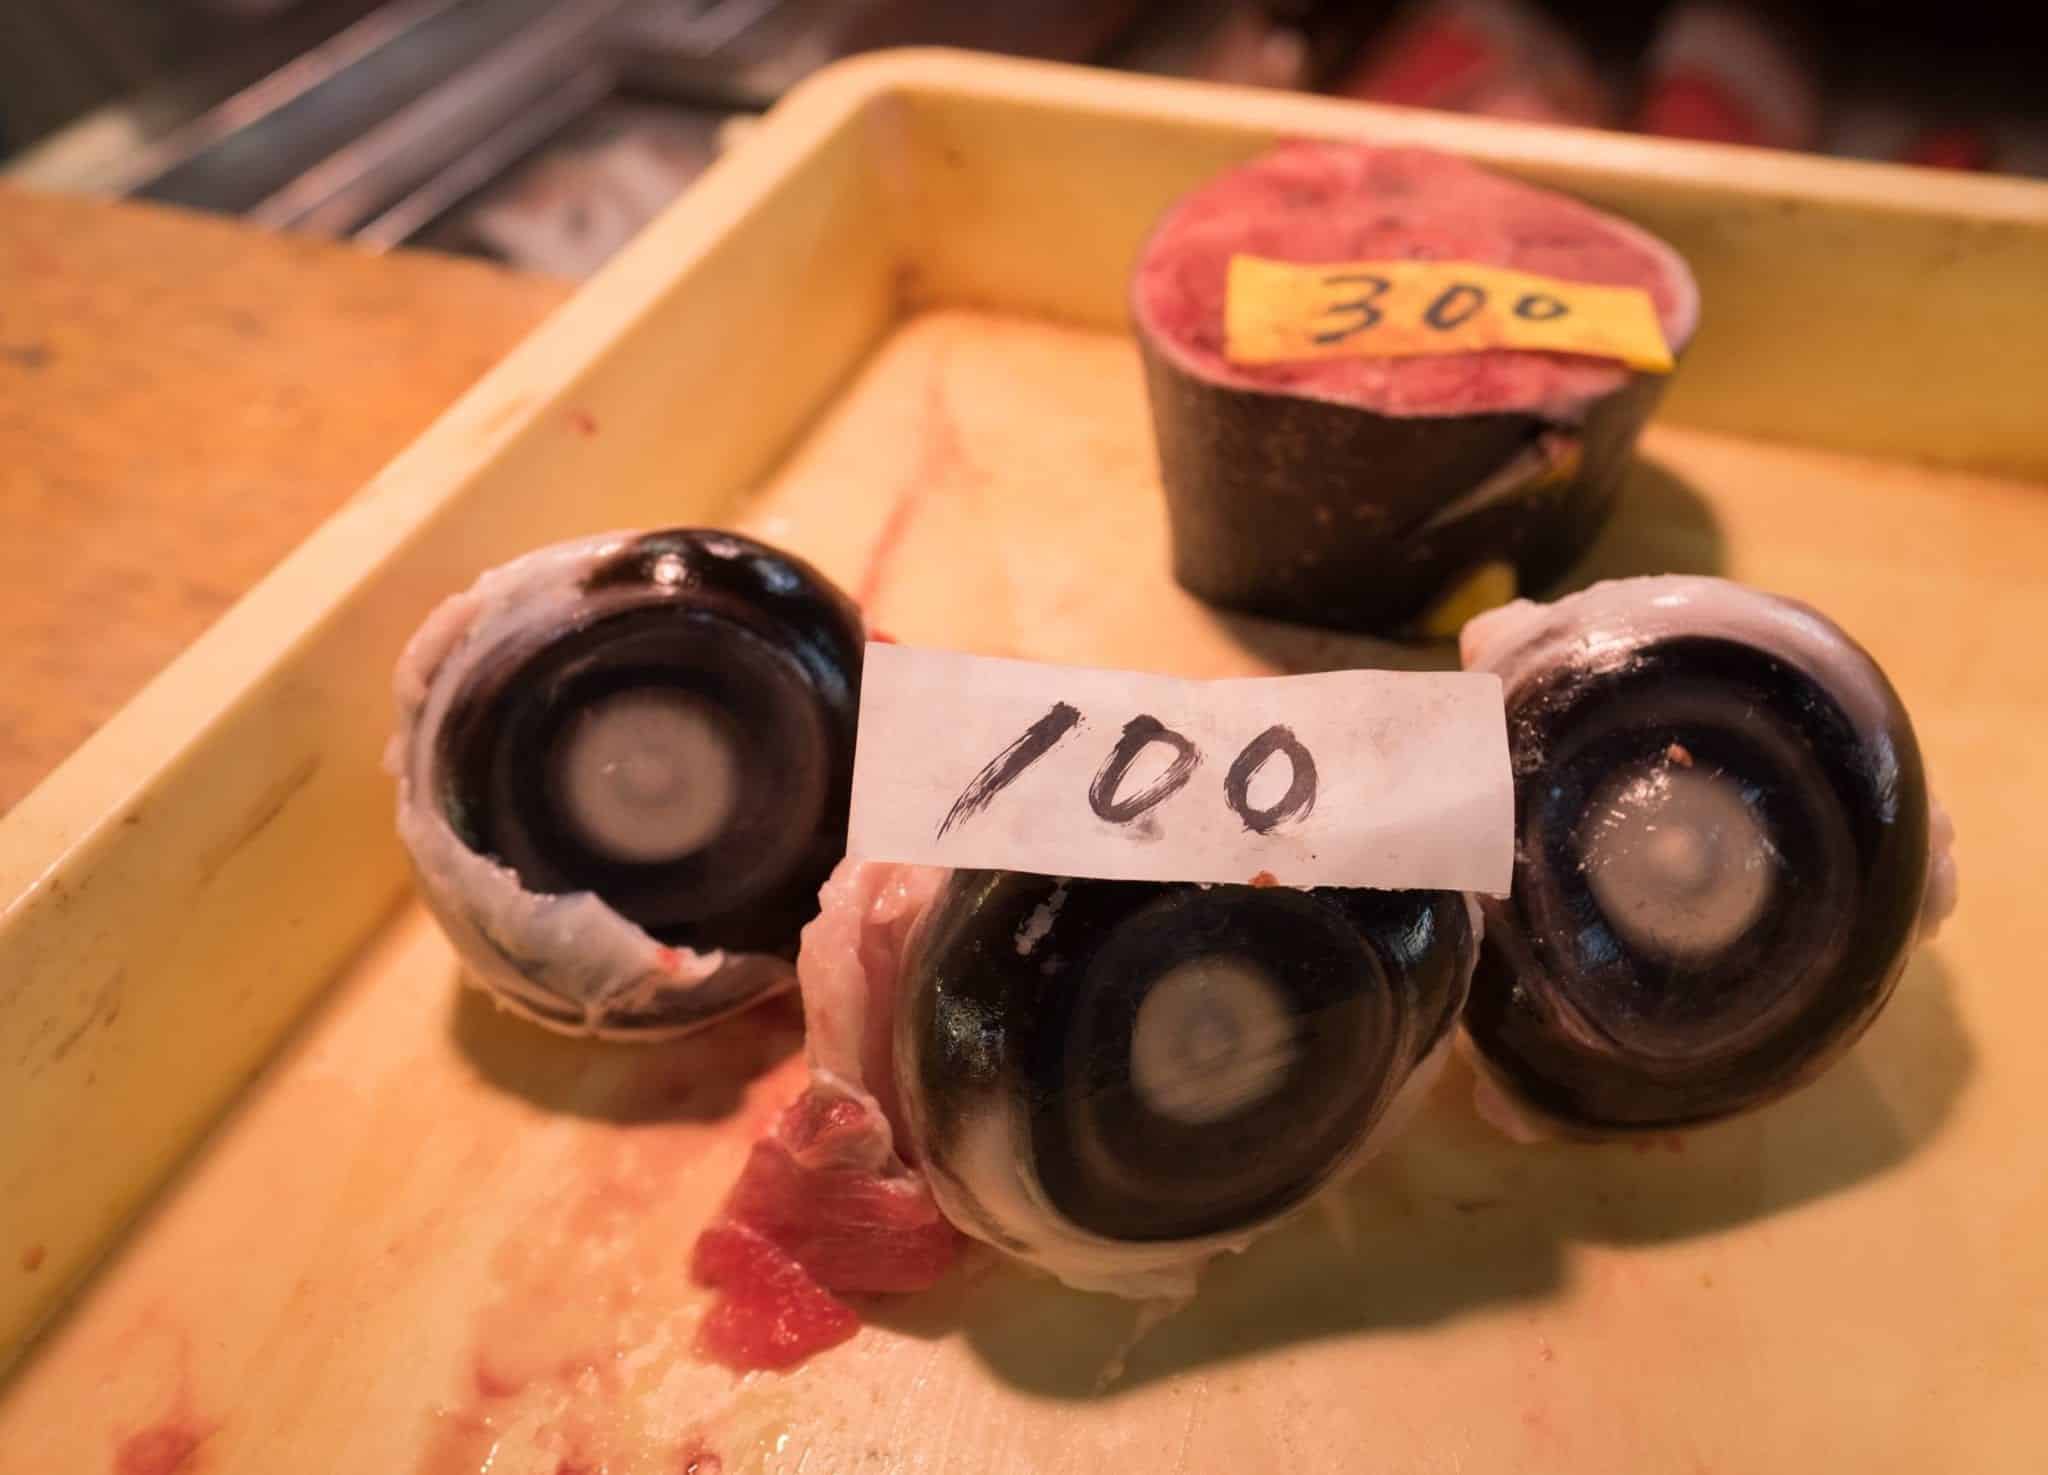
Tsukiji Fish Market was not what I expected — I thought it would be a more public market, the kind of place where fresh fish are on display and old ladies haggle the vendors down for every last yen. It wasn’t like that at all. Most of the market was where vendors do their work and sell wholesale. Regular consumers do their shopping outside the main market. As a result, I was relieved I had a tour guide for this place — I would have had no idea where to go without him.

We did our eating on the outside of the market, starting with the intriguingly named “parent and child” dish.

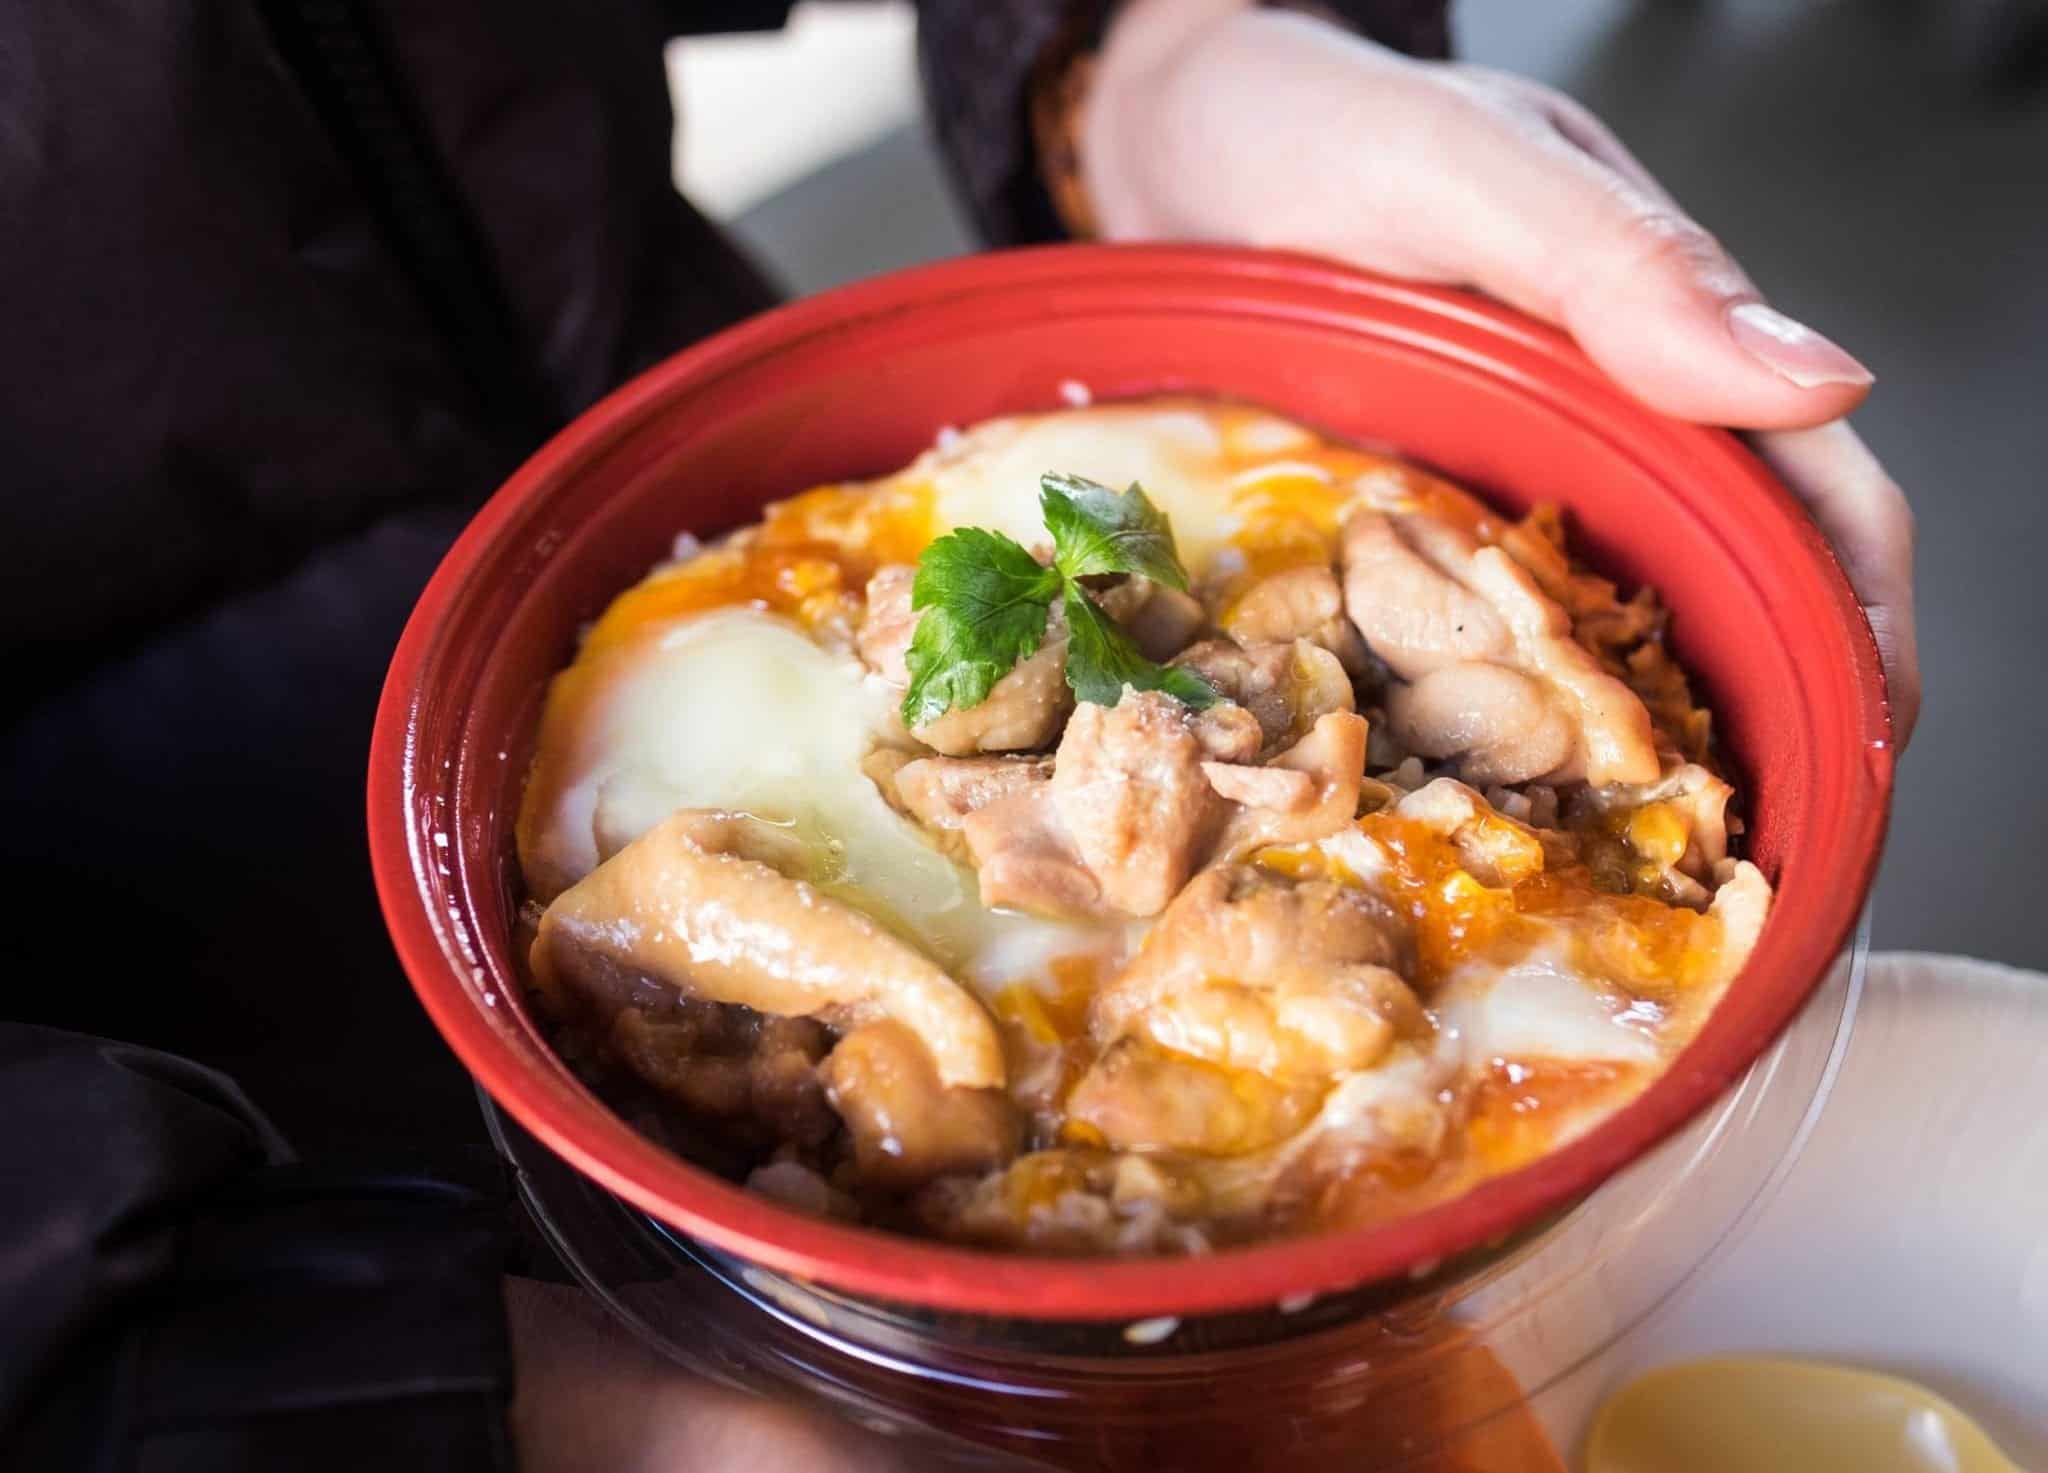
Did you know that lots of fishmongers don’t like to eat seafood? It makes sense; if you’re surrounded by fish all day, it’s probably not that appetizing. Yuma introduced us to oyakodon, a savory chicken and egg stew over rice. Oyakodon means “parent and child,” reminding me of I will bathe you in your children memes.

My first thought was, “Wow, those eggs are runny.” Then I took a bite and learned just how delicious those runny eggs were! This dish was fantastic, a gorgeous blend of flavors, far better than it looked, and I can understand why it’s a beloved Japanese comfort food.

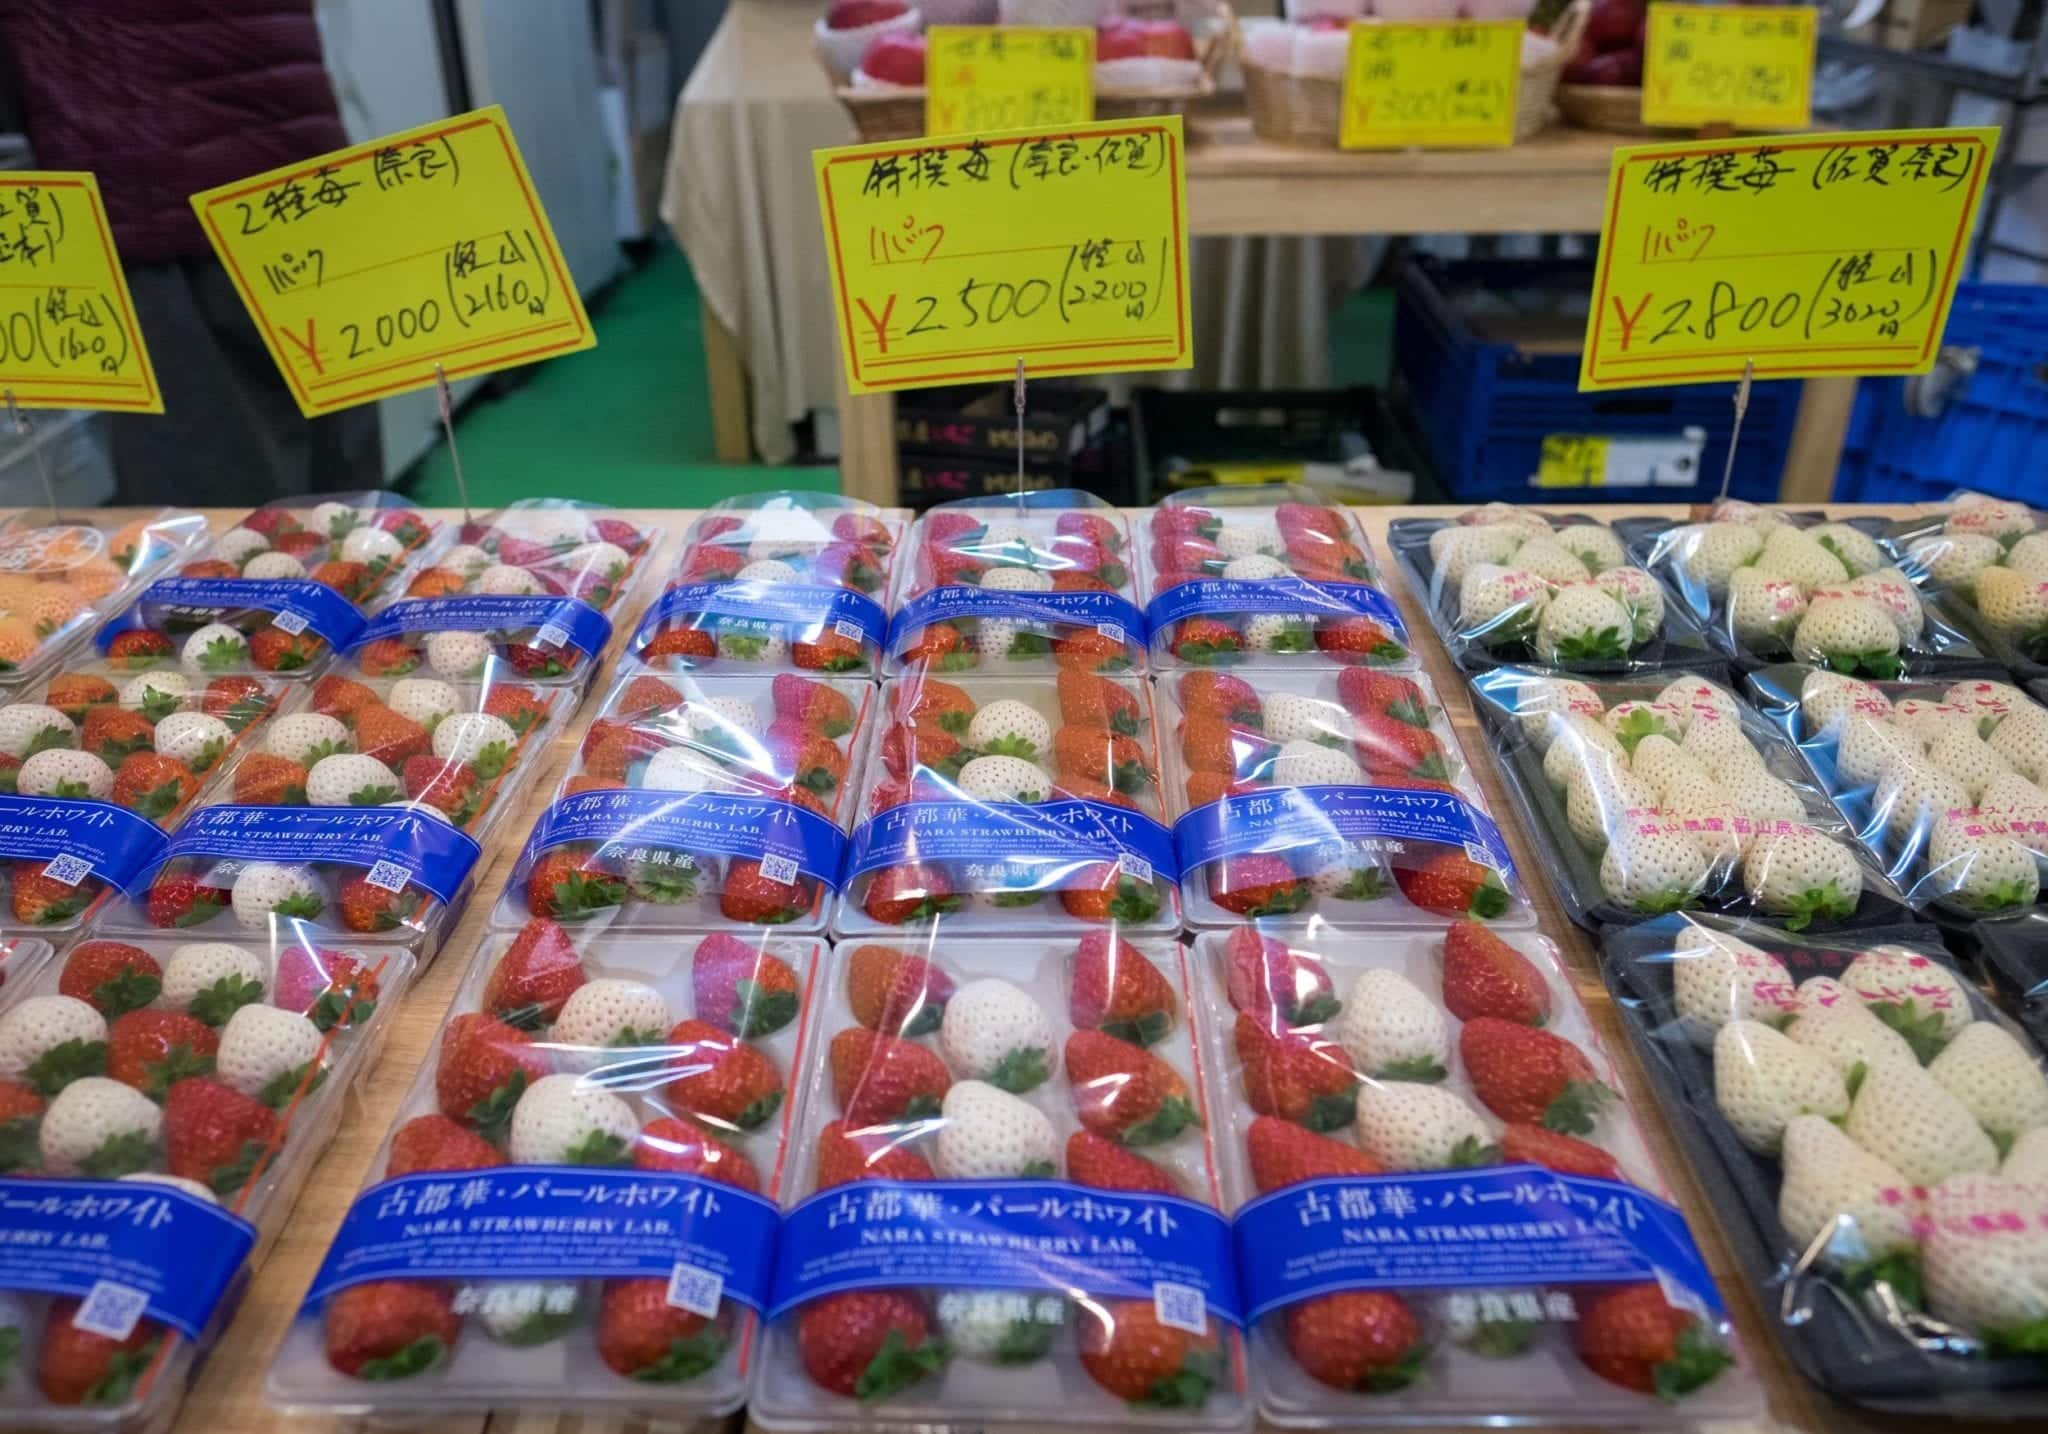
Winter is the beginning of strawberry season, and there were so many on offer. In Japanese style, most strawberries were immaculate — an even shade of bright red shaped into a perfect point. But WHITE strawberries were on display as well! We tried some and they don’t have much flavor, but they’re pleasing to the eye. The Japanese like to give them as gifts.

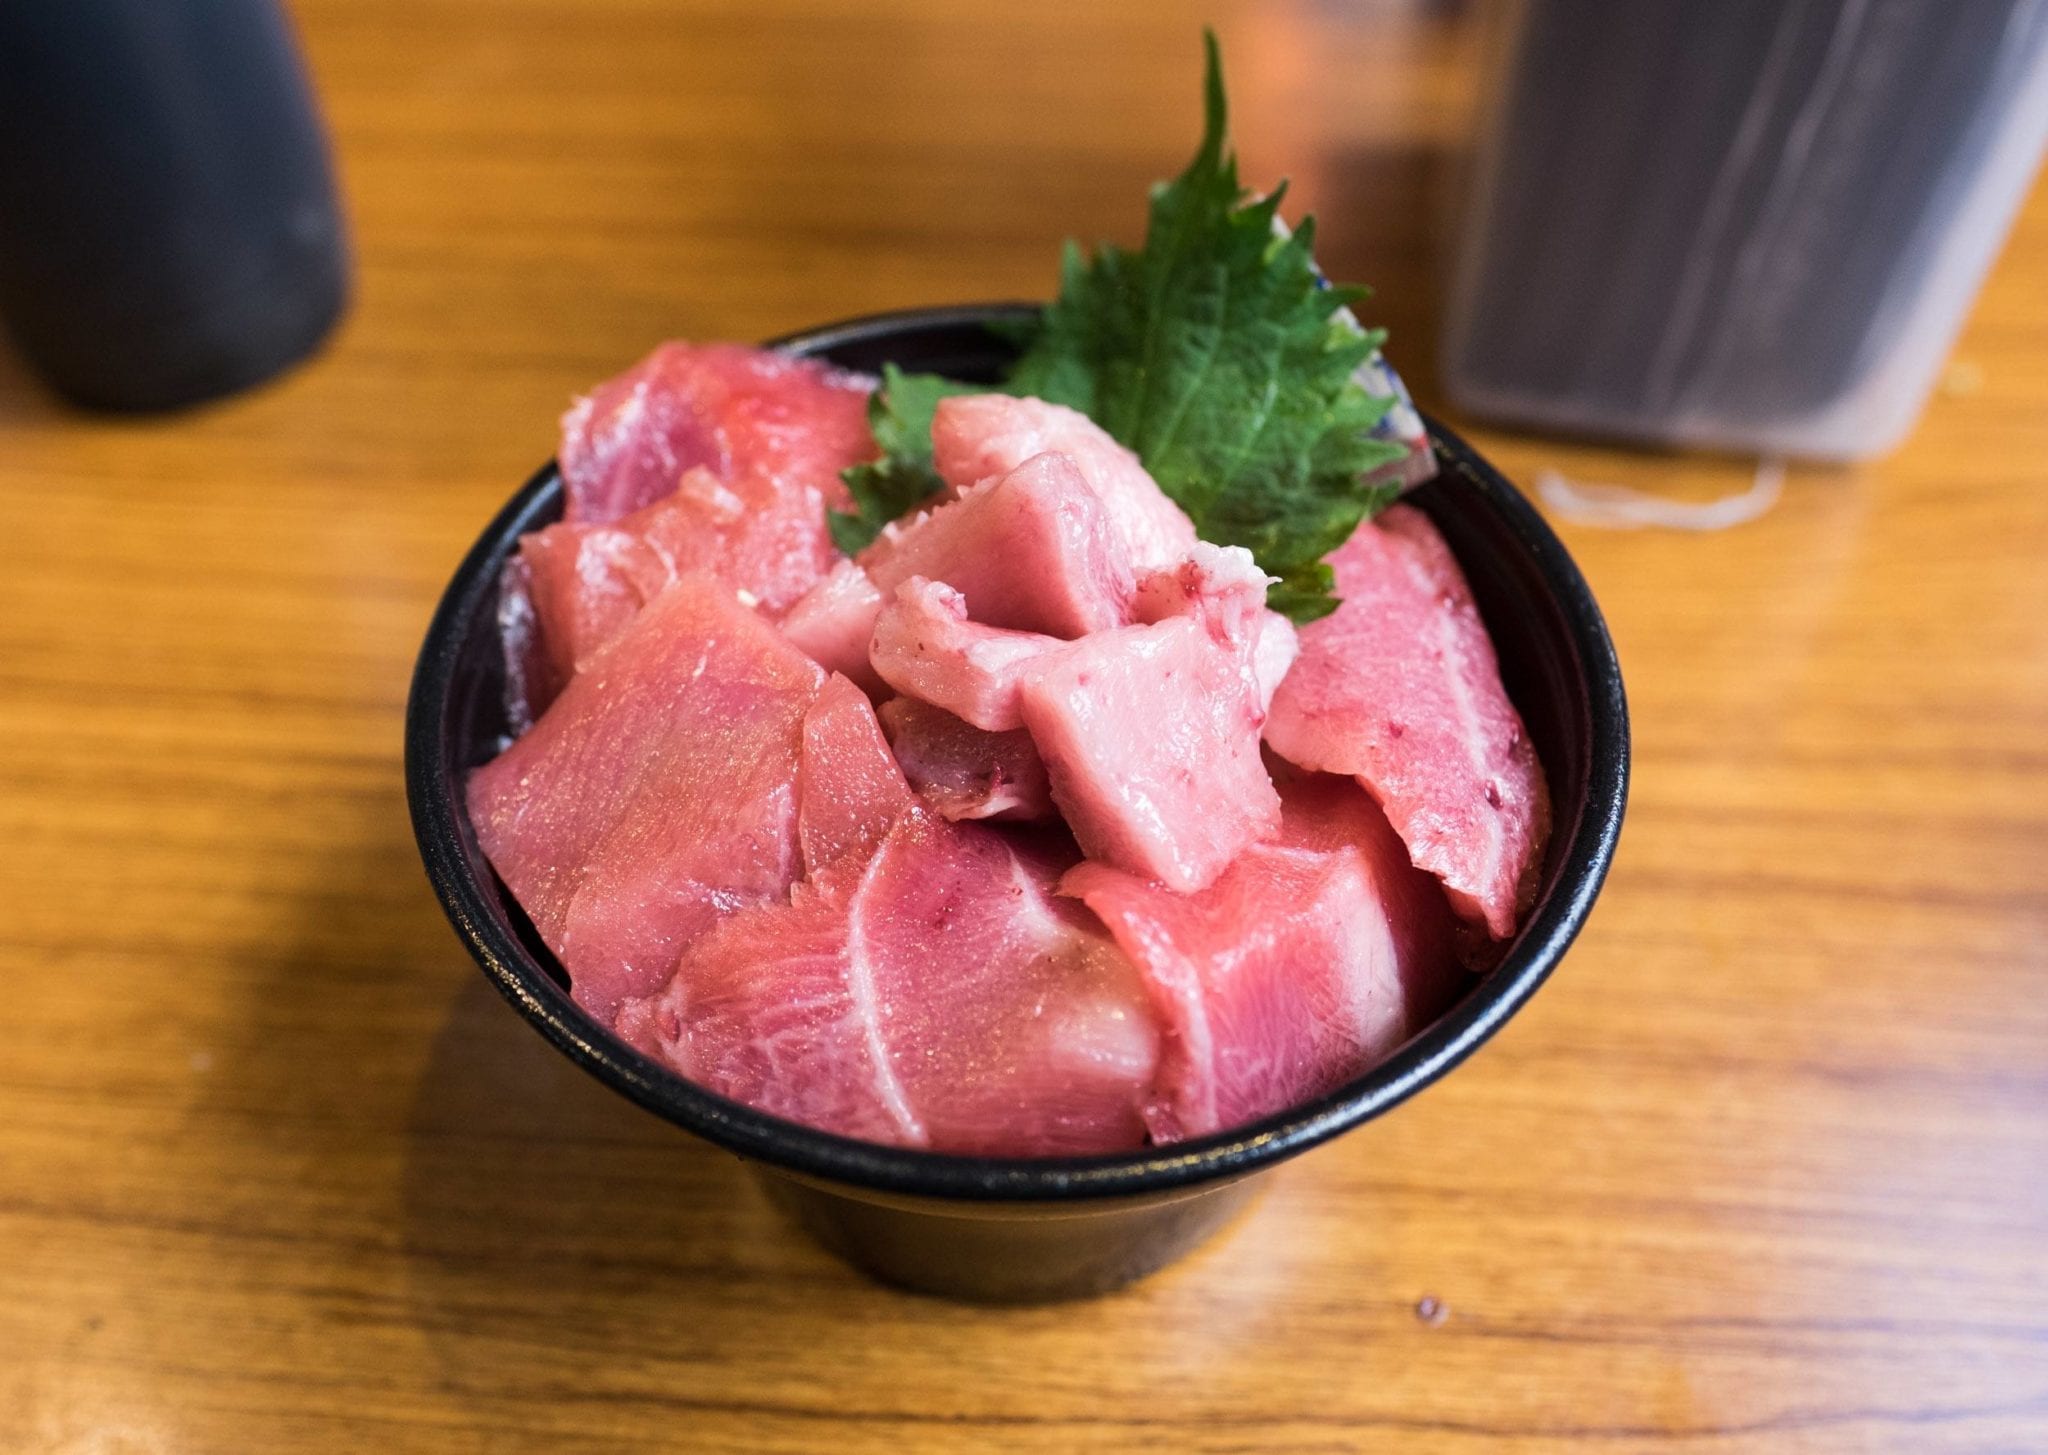
Of course we had to have some fresh tuna! This mini tuna bowl was so good, I could have eaten another one immediately. I’ve never had one so good in my life. The Japanese way is to start with the leaner, redder fish around the edge then move on to the lighter, fattier pieces.

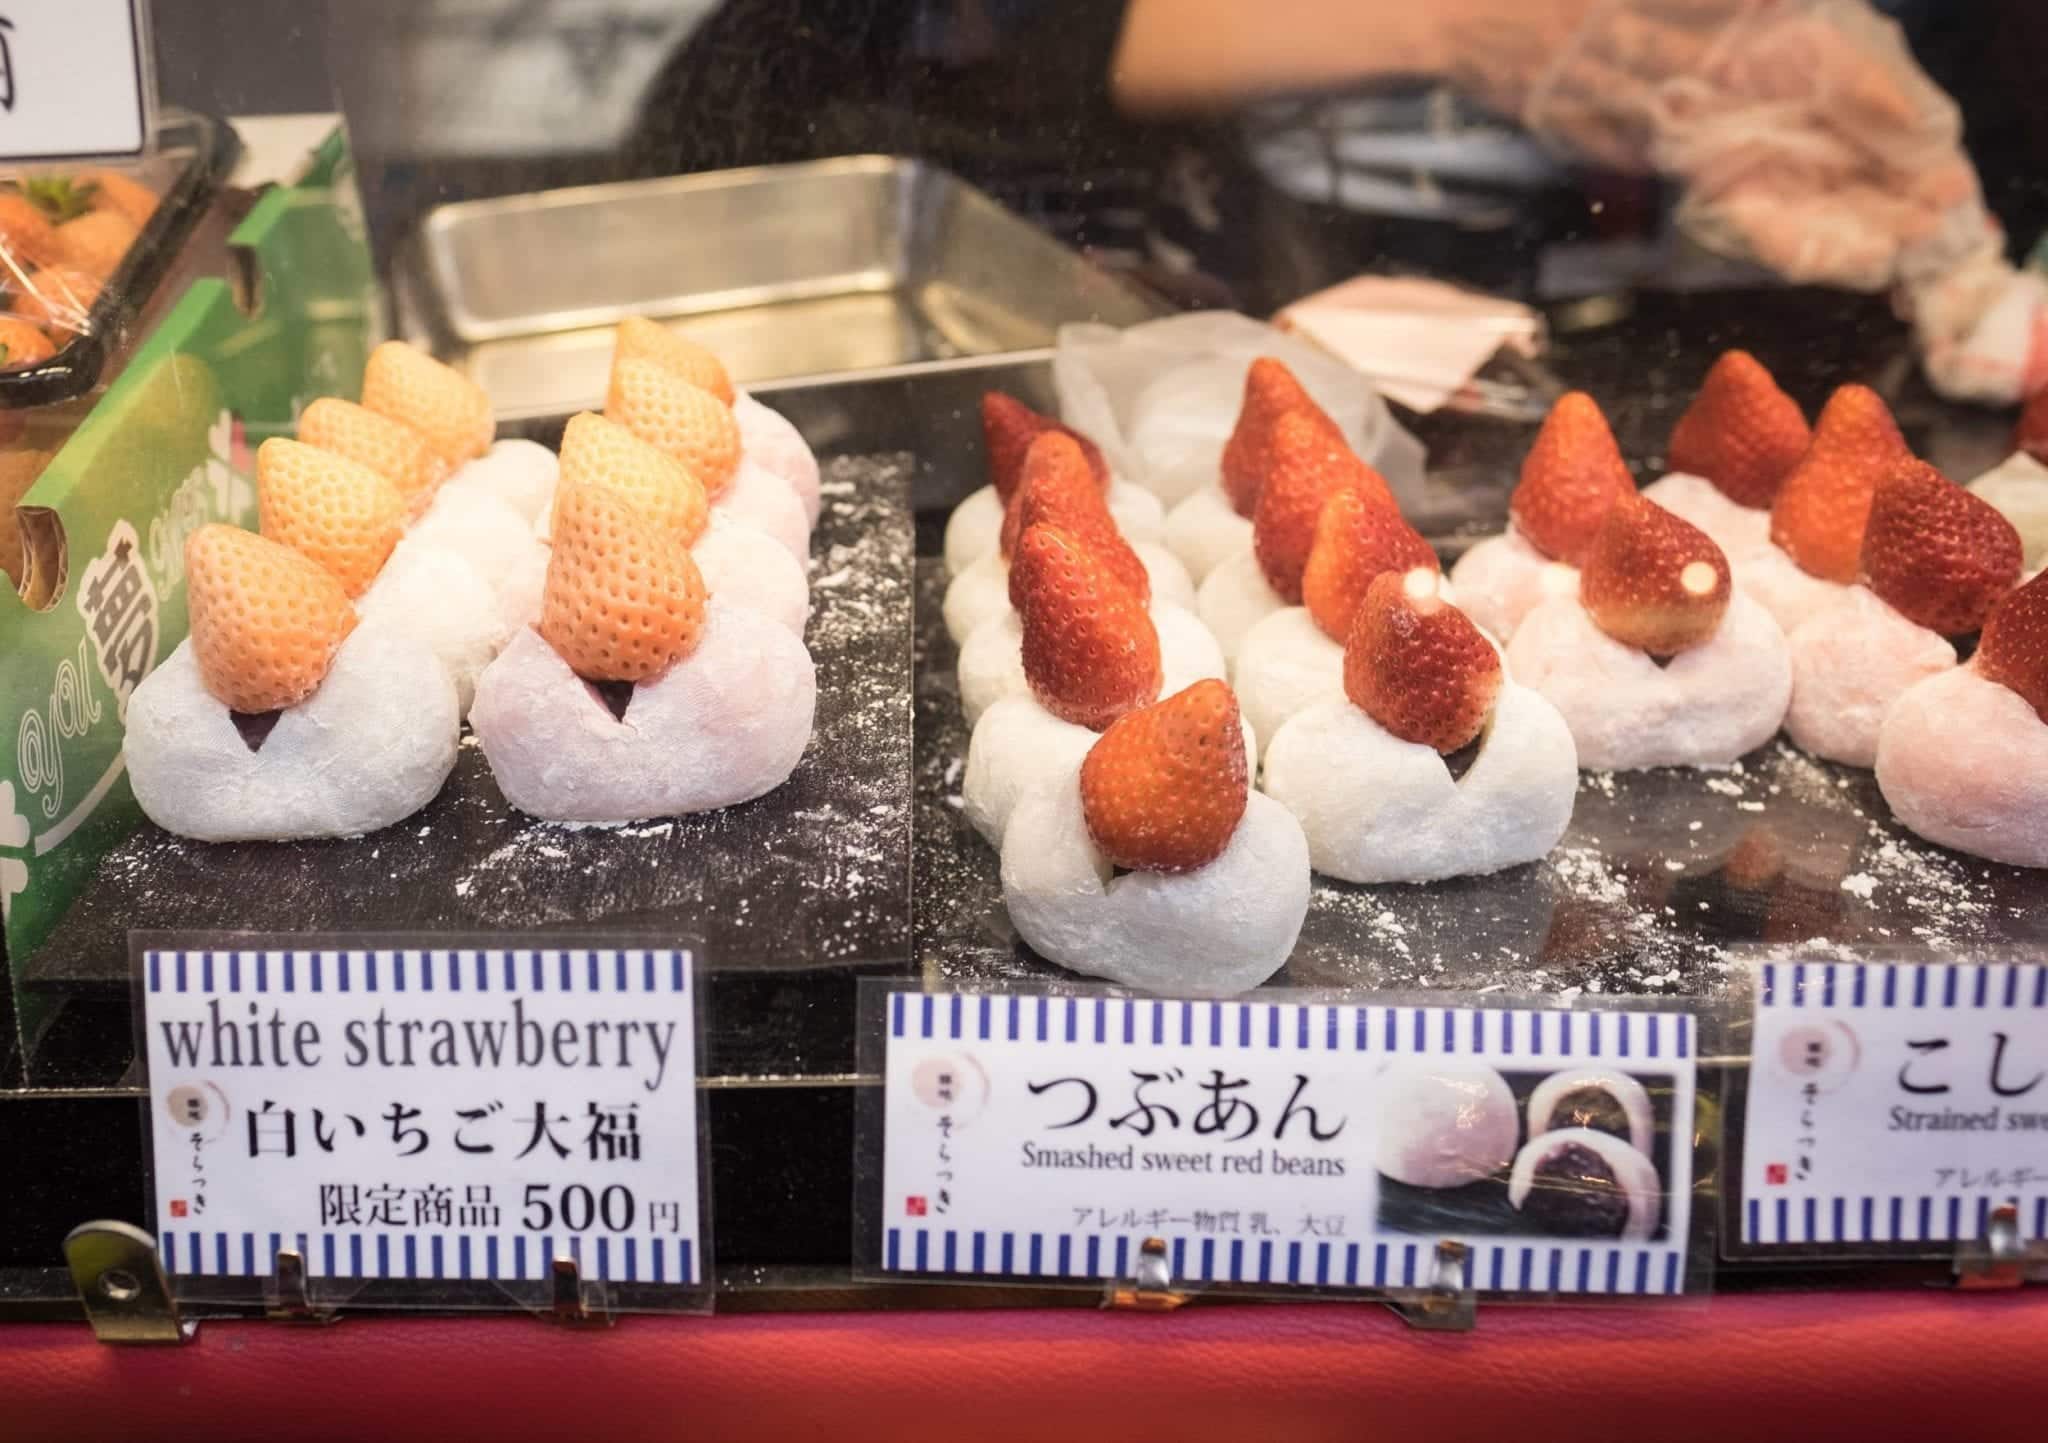
My favorite item of all? Custard-flavored mochi with strawberry. OH, these are the best dessert IN THE WORLD. I’ve been hit-or-miss with the popular Japanese rice-based sweet before, but custard-flavored mochi is the best blend of eastern and western flavors. Guys, I got so addicted to these, I was eating one every day! I even found a seller in Kyoto Station who laughed whenever I showed up at her cart for my next hit.

I so enjoyed this food tour! Yuma is a great guide and lived in the US for awhile, so we had a lot to talk about. He even kindly emailed me food recommendations for Kyoto.

If you do go to Tsukiji Fish Market, with or without a guide, please keep in mind that this is a working market, not a theme park. Be thoughtful in your photography, especially of the fishmongers; don’t treat the market like a human zoo. Keep a respectful distance. Jump out of anyone’s way. You are a guest here and people are just trying to get their work done.

Golden Gai

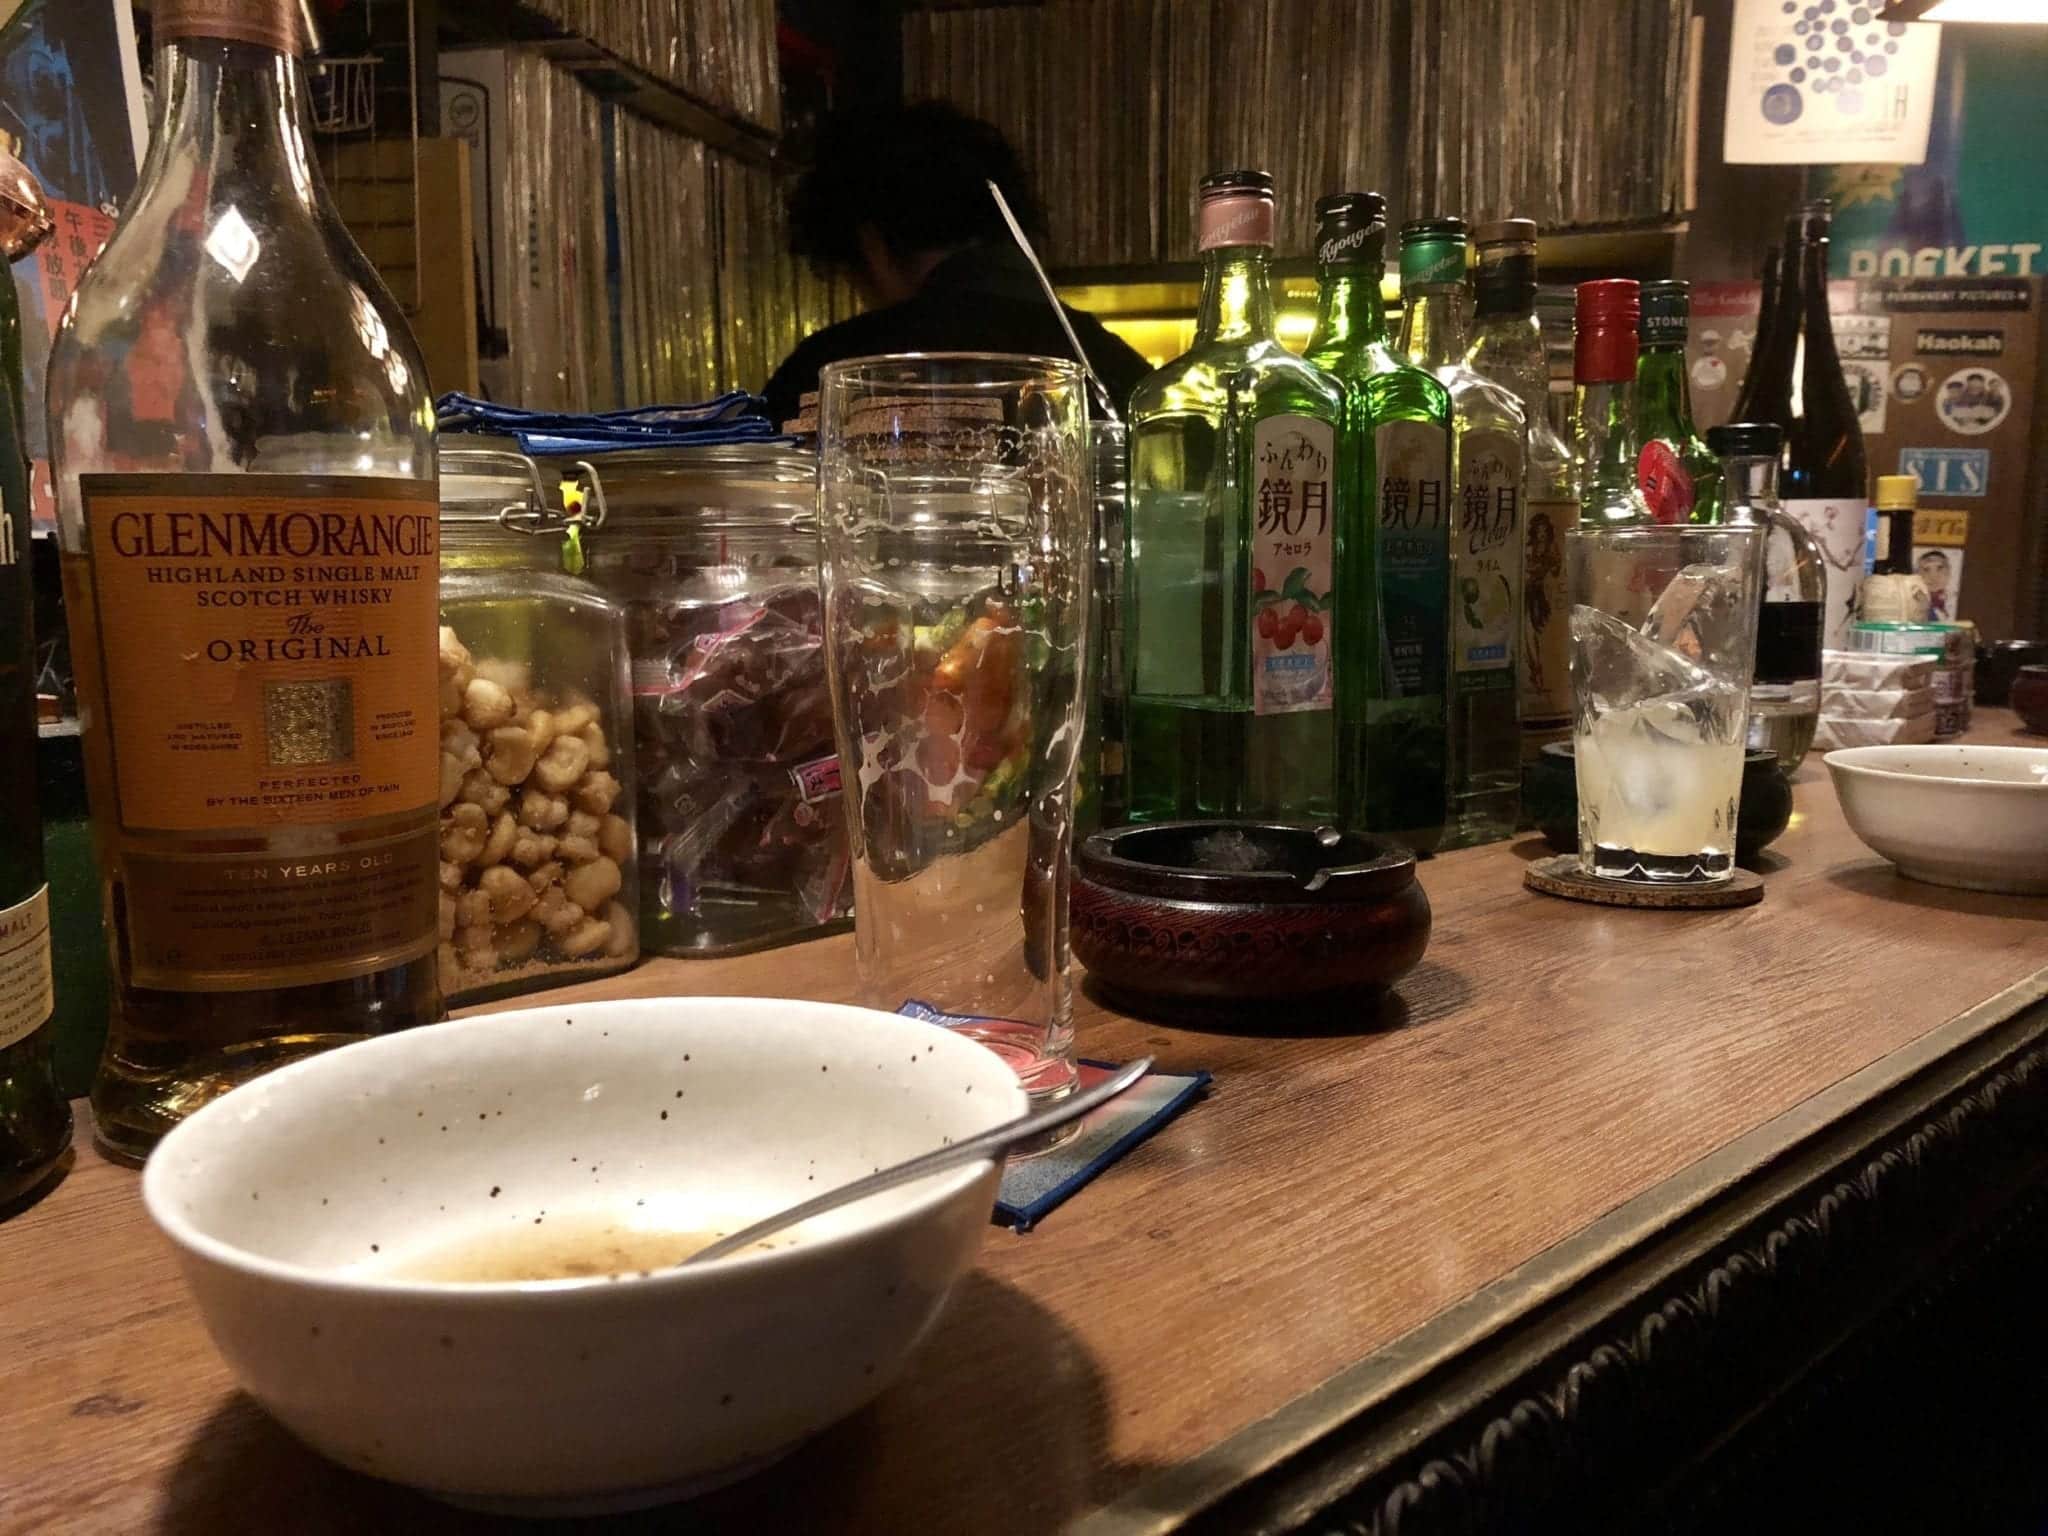
Golden Gai was one of the highlights of my first trip to Tokyo — it’s a neighborhood filled with tiny hovel bars, many of them themed, stacked on top of each other. Some are members-only; if there’s English signage, you can assume non-members are welcome.

Many of these bars have cover charges. This time, contrary to last time, a cover charge wasn’t a deal-breaker. I stepped into a tiny six-seat bar stacked with vinyl records where two thirty-something locals were already deep into their cocktails. The bartender and locals welcomed me with smiles.

And I stayed. Rather than hopping around the cheapest bars in the neighborhood, I found one moderately priced bar and stayed there for a few beers, enjoying the music, chatting with my new companions. The bartender and customers mostly chatted amongst themselves but would occasionally translate and bring me into the conversation, which I appreciated!

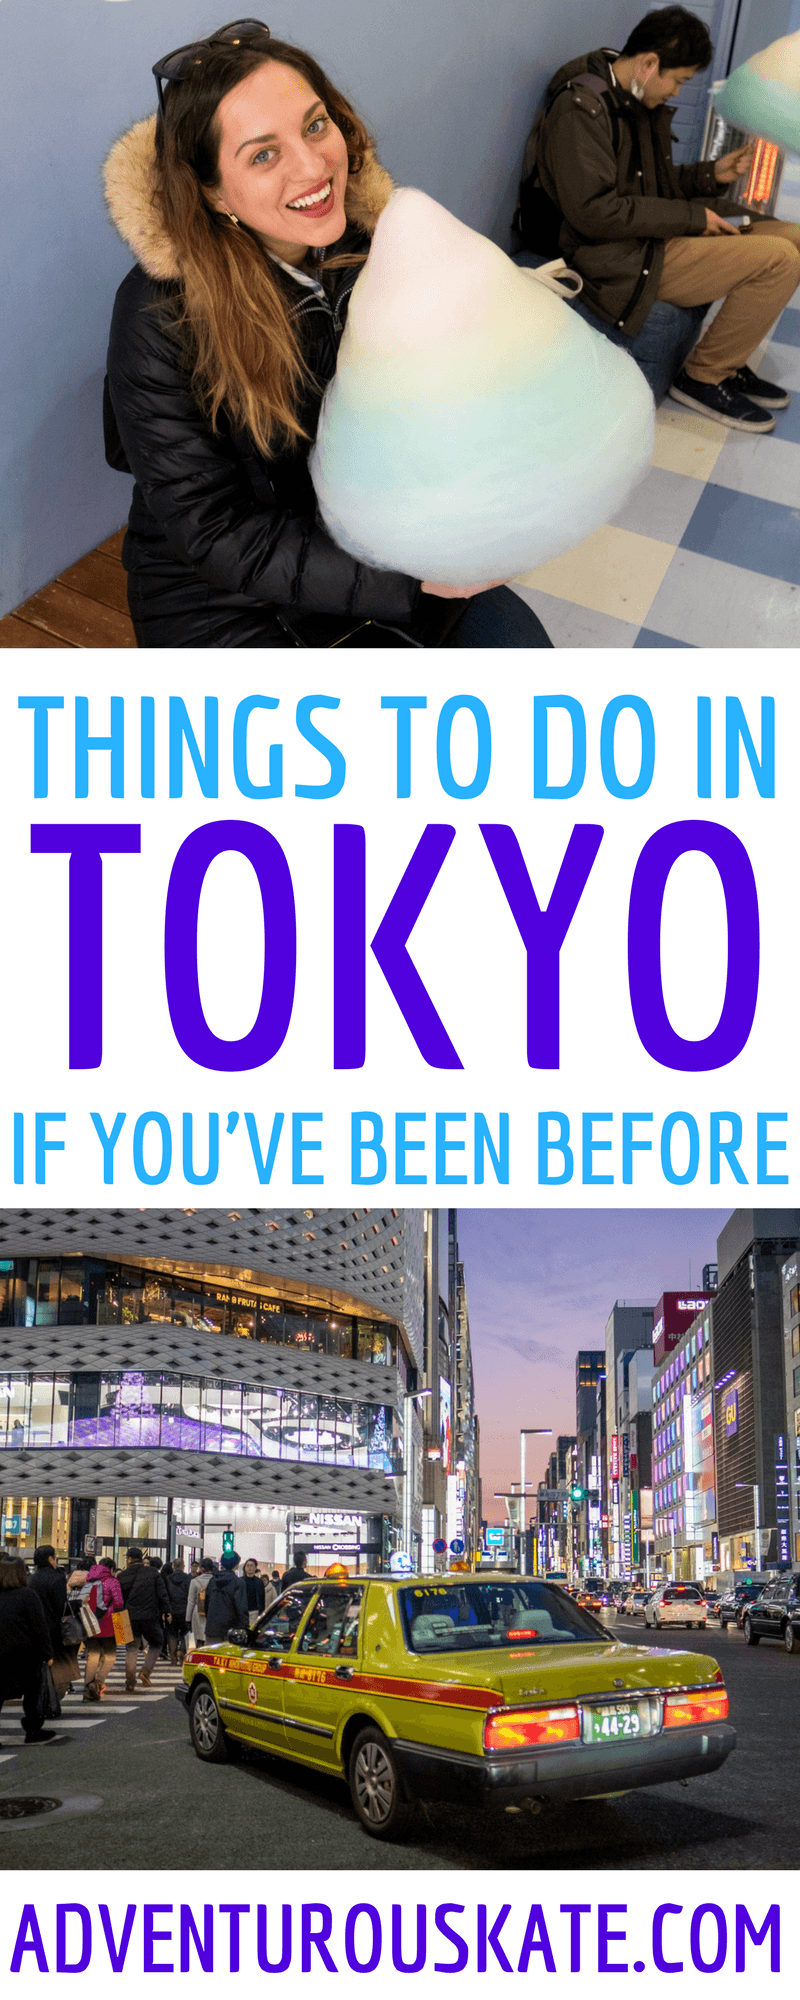
Giant Cotton Candy in Harajuku

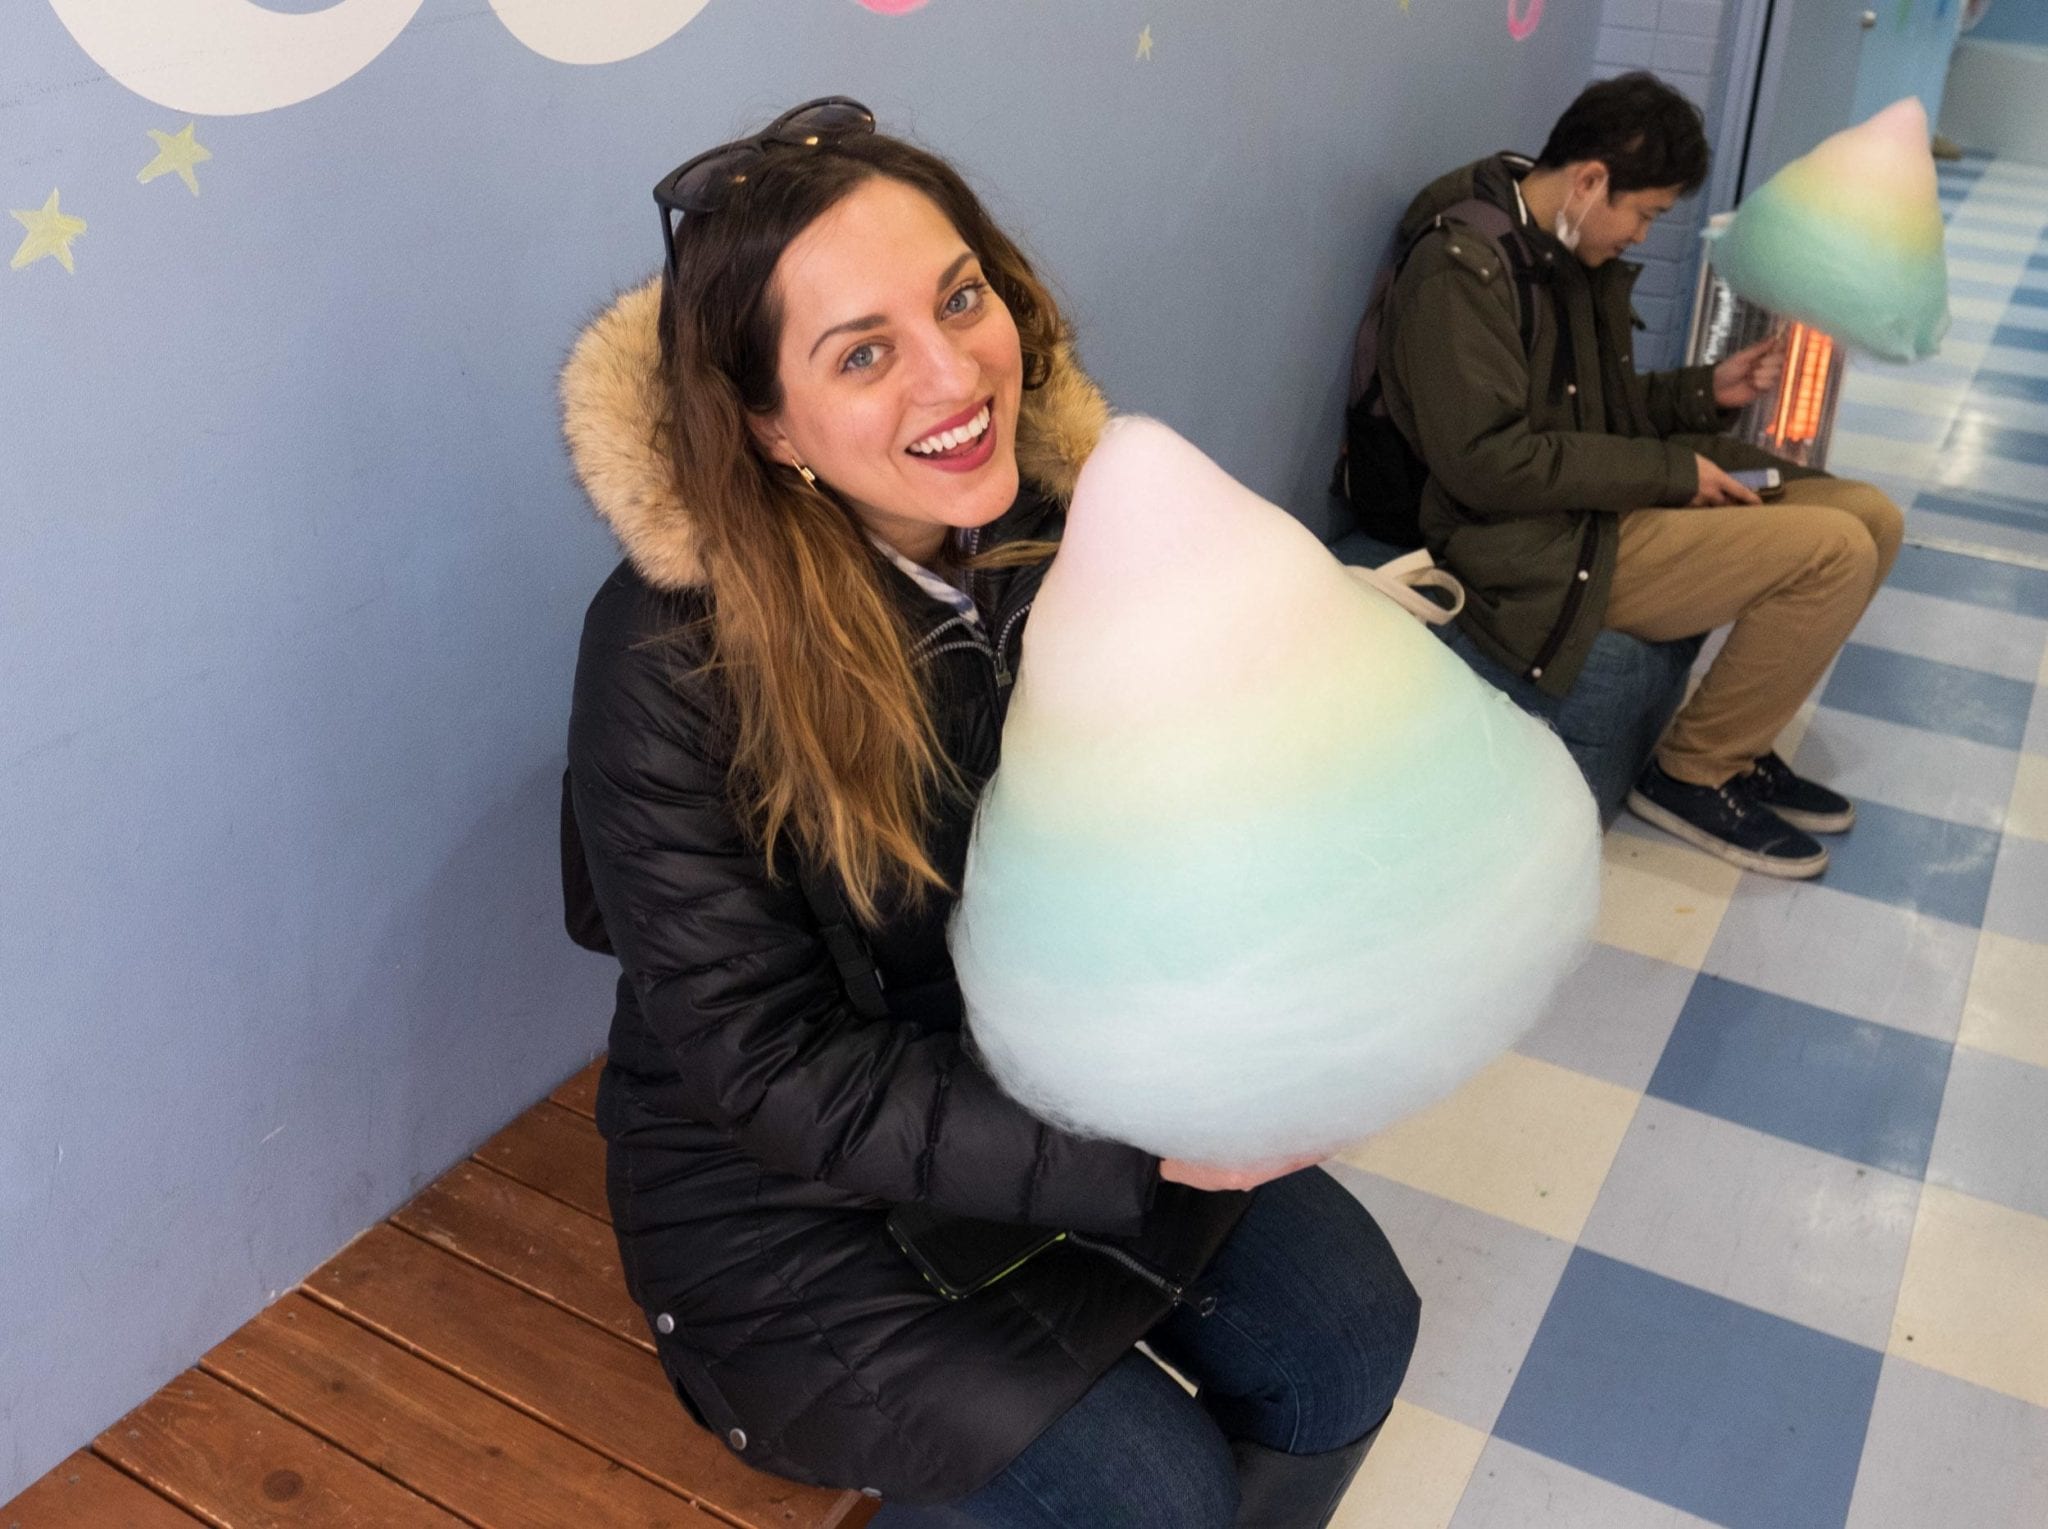
Harajuku might be the most famous neighborhood in Tokyo — it’s the center of “kawaii” (cute) culture. This is where you’re likeliest to find outlandish Tokyo fashion and costumed locals, especially on Saturdays. And Instagram has gotten HUGE since my last visit in 2013, so there are lots of places catering to photo seekers with cool backdrops and unusual foods.

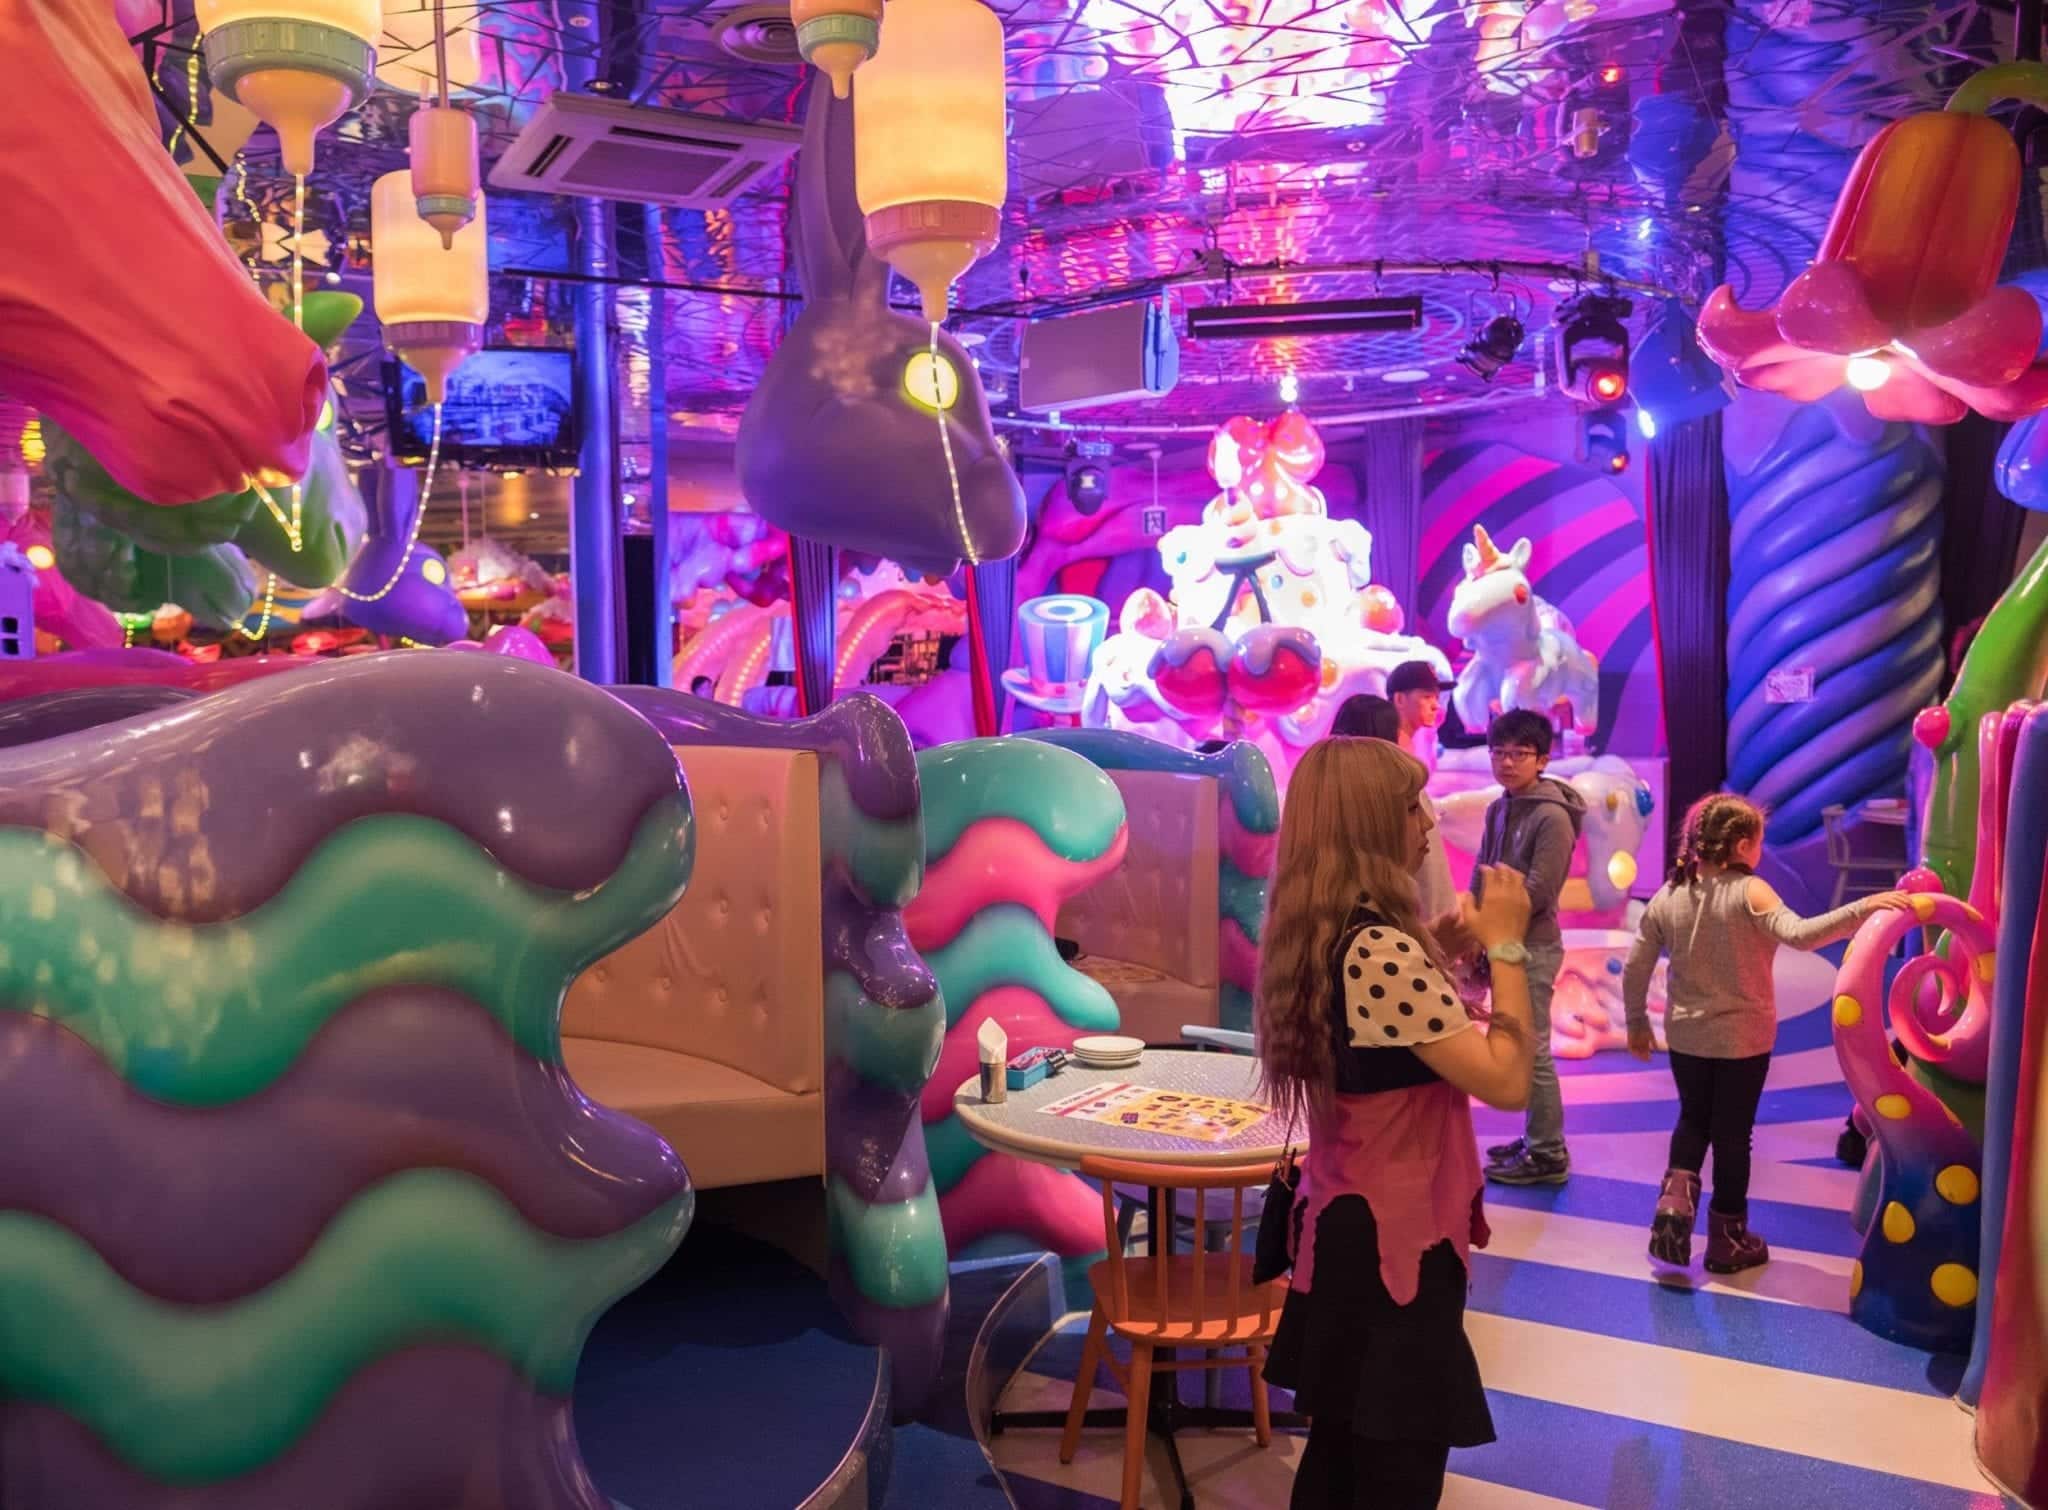
I’ll be honest — this time around, Harajuku was a bit much for my taste. Takeshita Street assaulted my senses and the Kawaii Monster Cafe, though so very Japanese, is not something I’d recommend unless you have kids and/or are into kawaii culture.

I did, however, get a giant cotton candy! Instagrammable as hell and surprisingly delicious. Each flavor tastes different — I loved the sour blue cotton candy. Yep, I ate the whole thing. You’ll find vendors selling it on Takeshita Street.
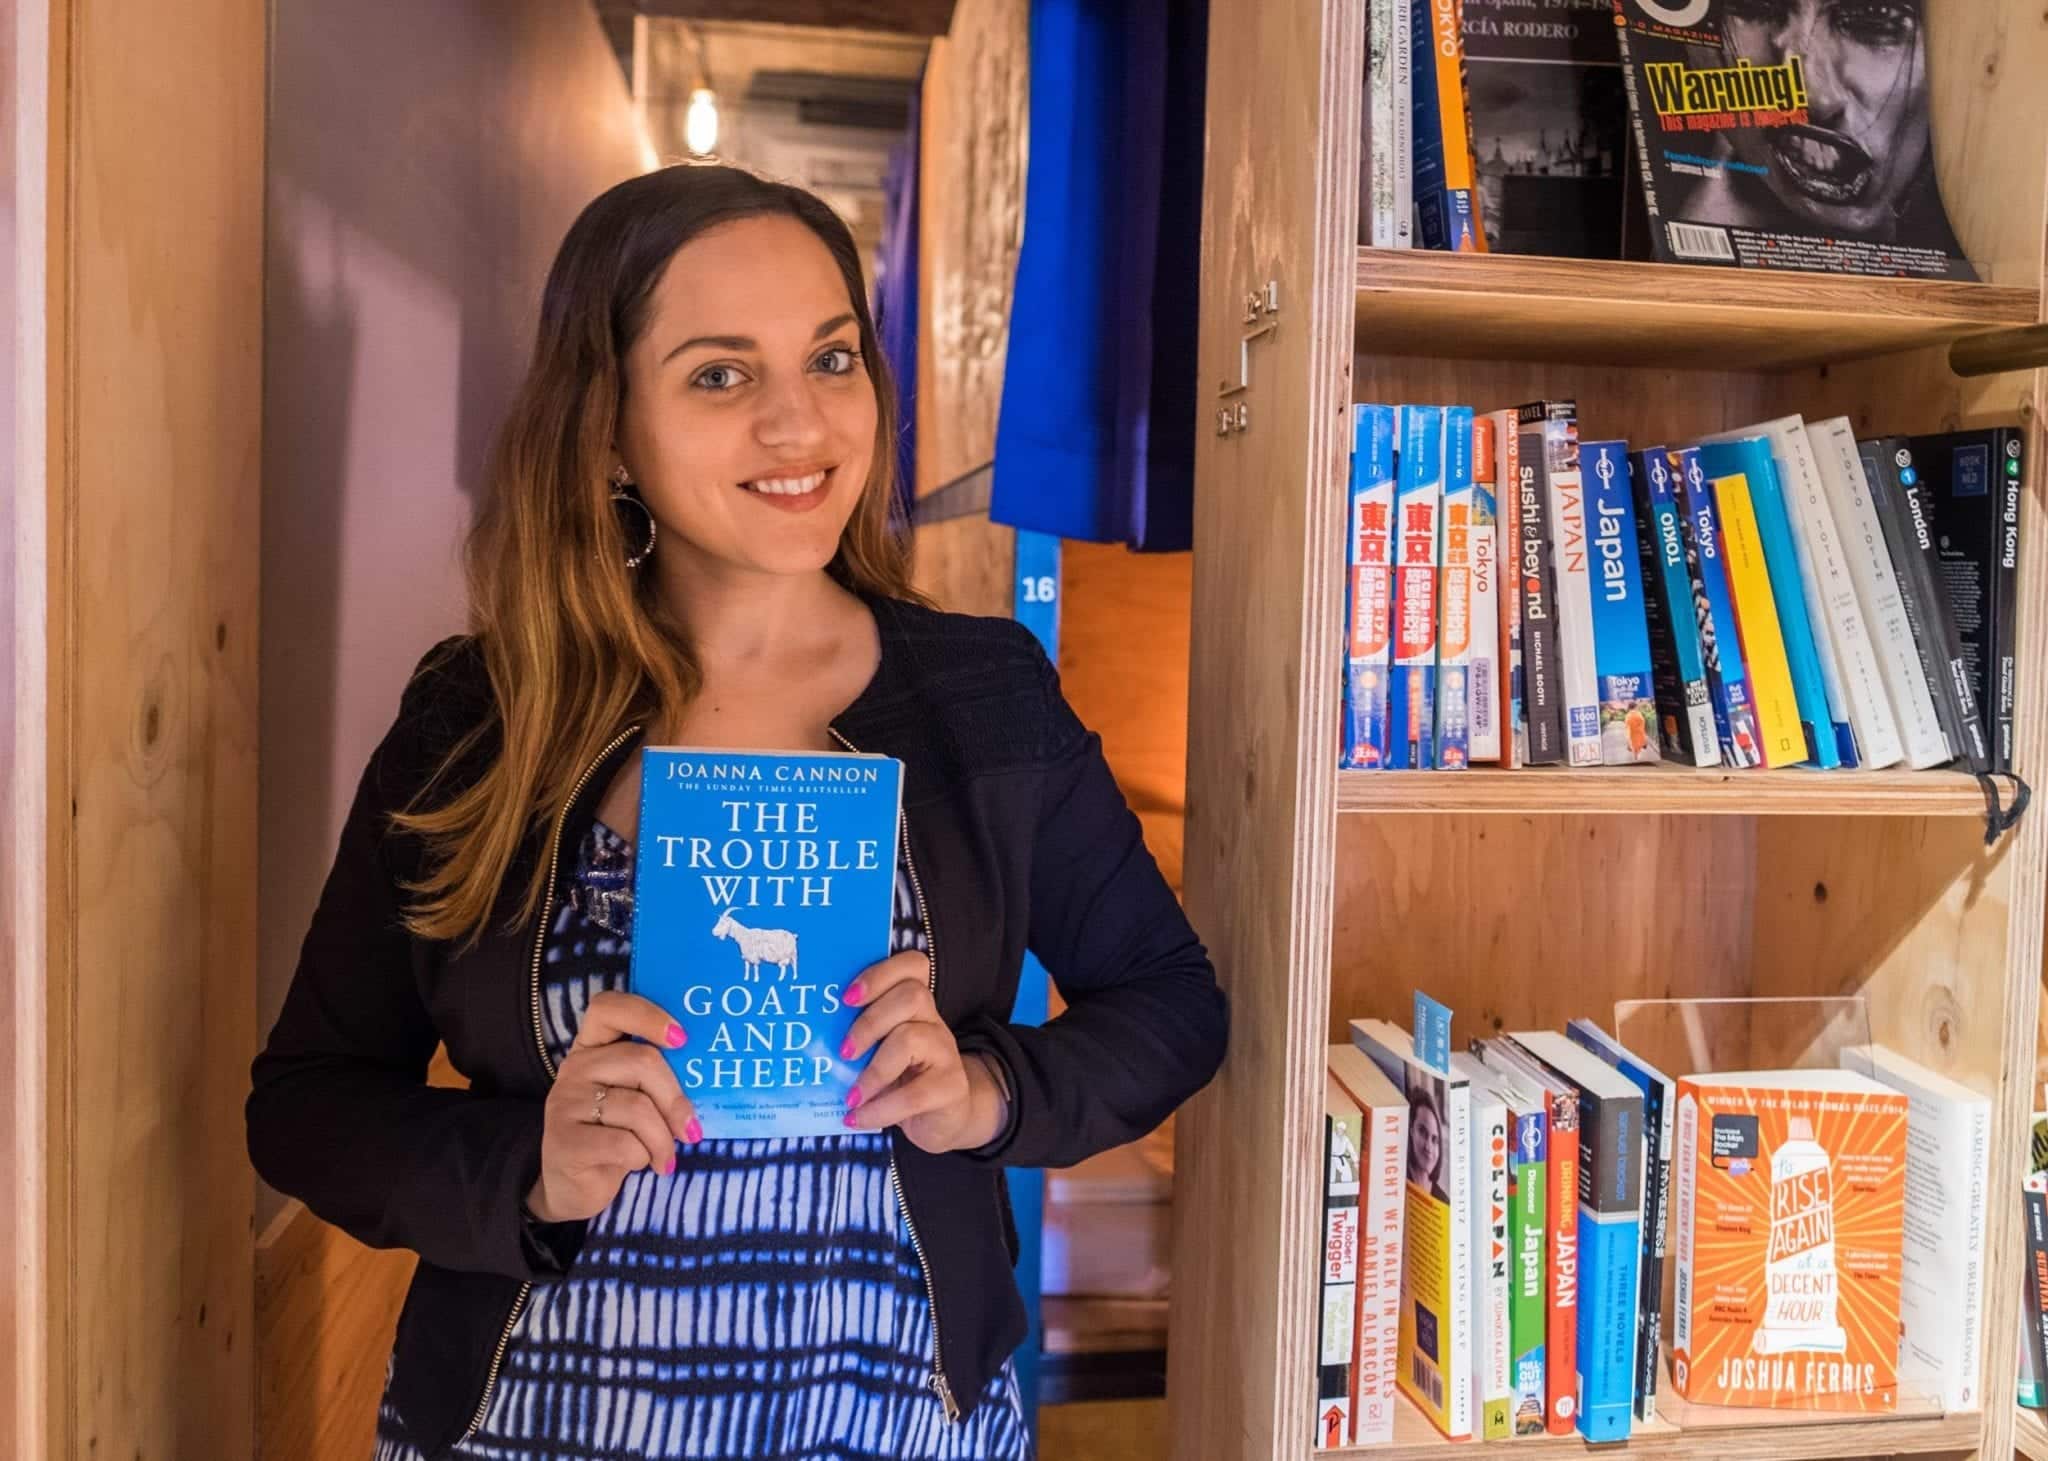
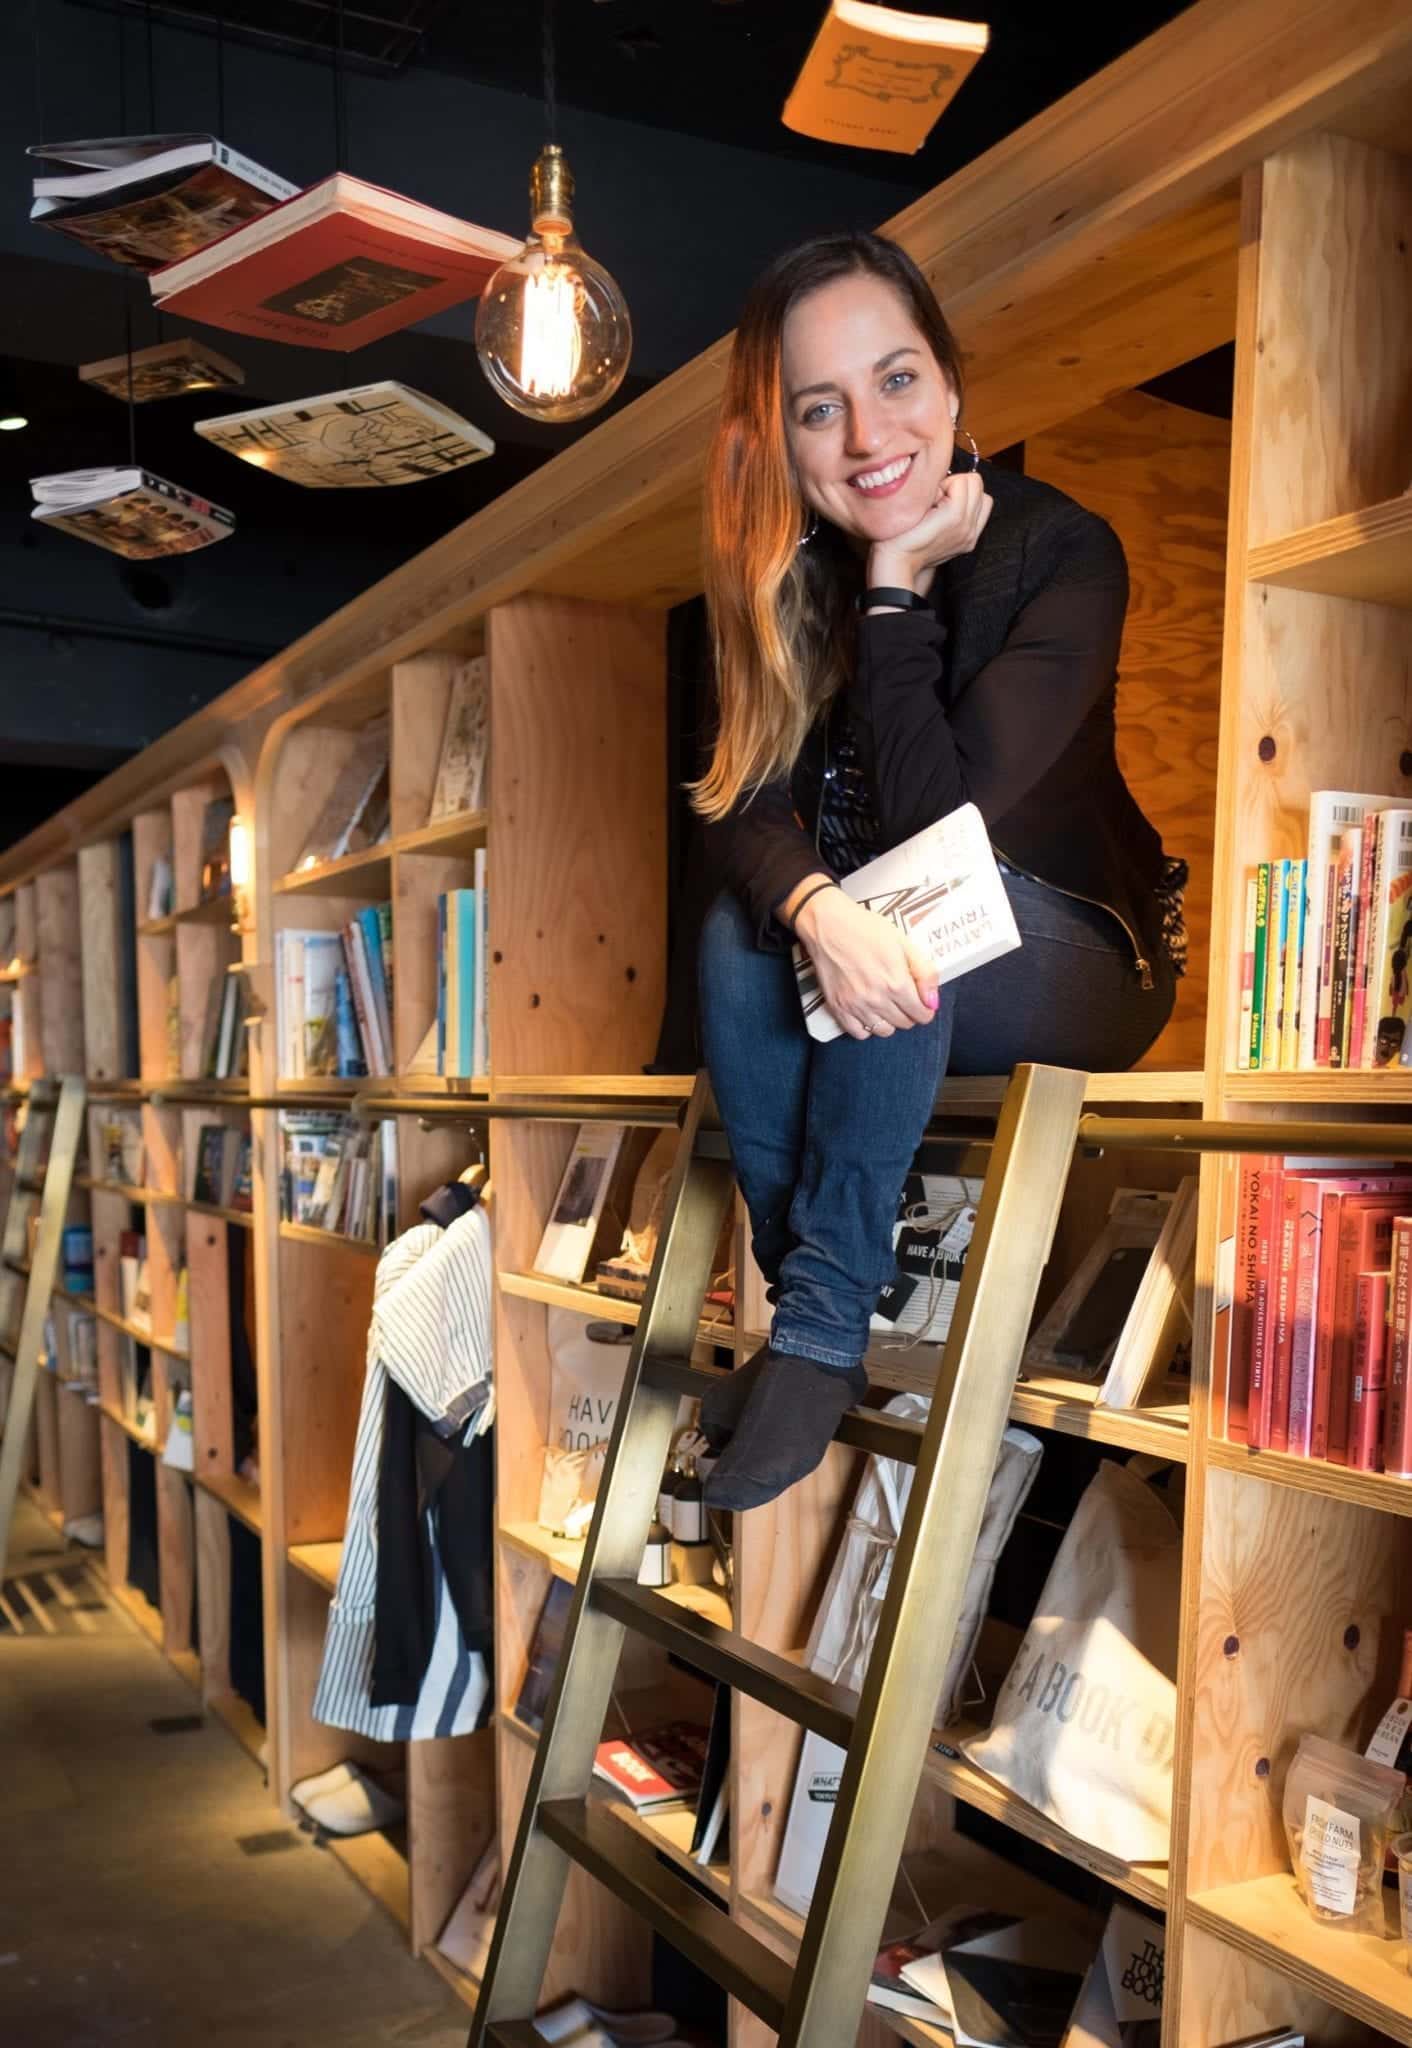
Tokyo Book and Bed

One of my favorite things is when my friends think of things I’d like and offer to take me there. It’s especially nice when my friends acknowledge parts of my personality that have nothing to do with travel. (Like the time my friend Alexa texted me, “Hey, you love The Rock, wanna go see San Andreas in 3D IMAX?” HA.)

My friends Jessica and Hai from Notes of Nomads have been living in Tokyo for years and knowing how much I love to read, they suggested we check out Tokyo’s Book and Bed. This capsule hotel in the Ikebukuro neighborhood is covered with bookshelves and literary chandeliers. Have you ever dreamed of sleeping overnight in a library? I HAVE. This was a super fun place to do a photo shoot!

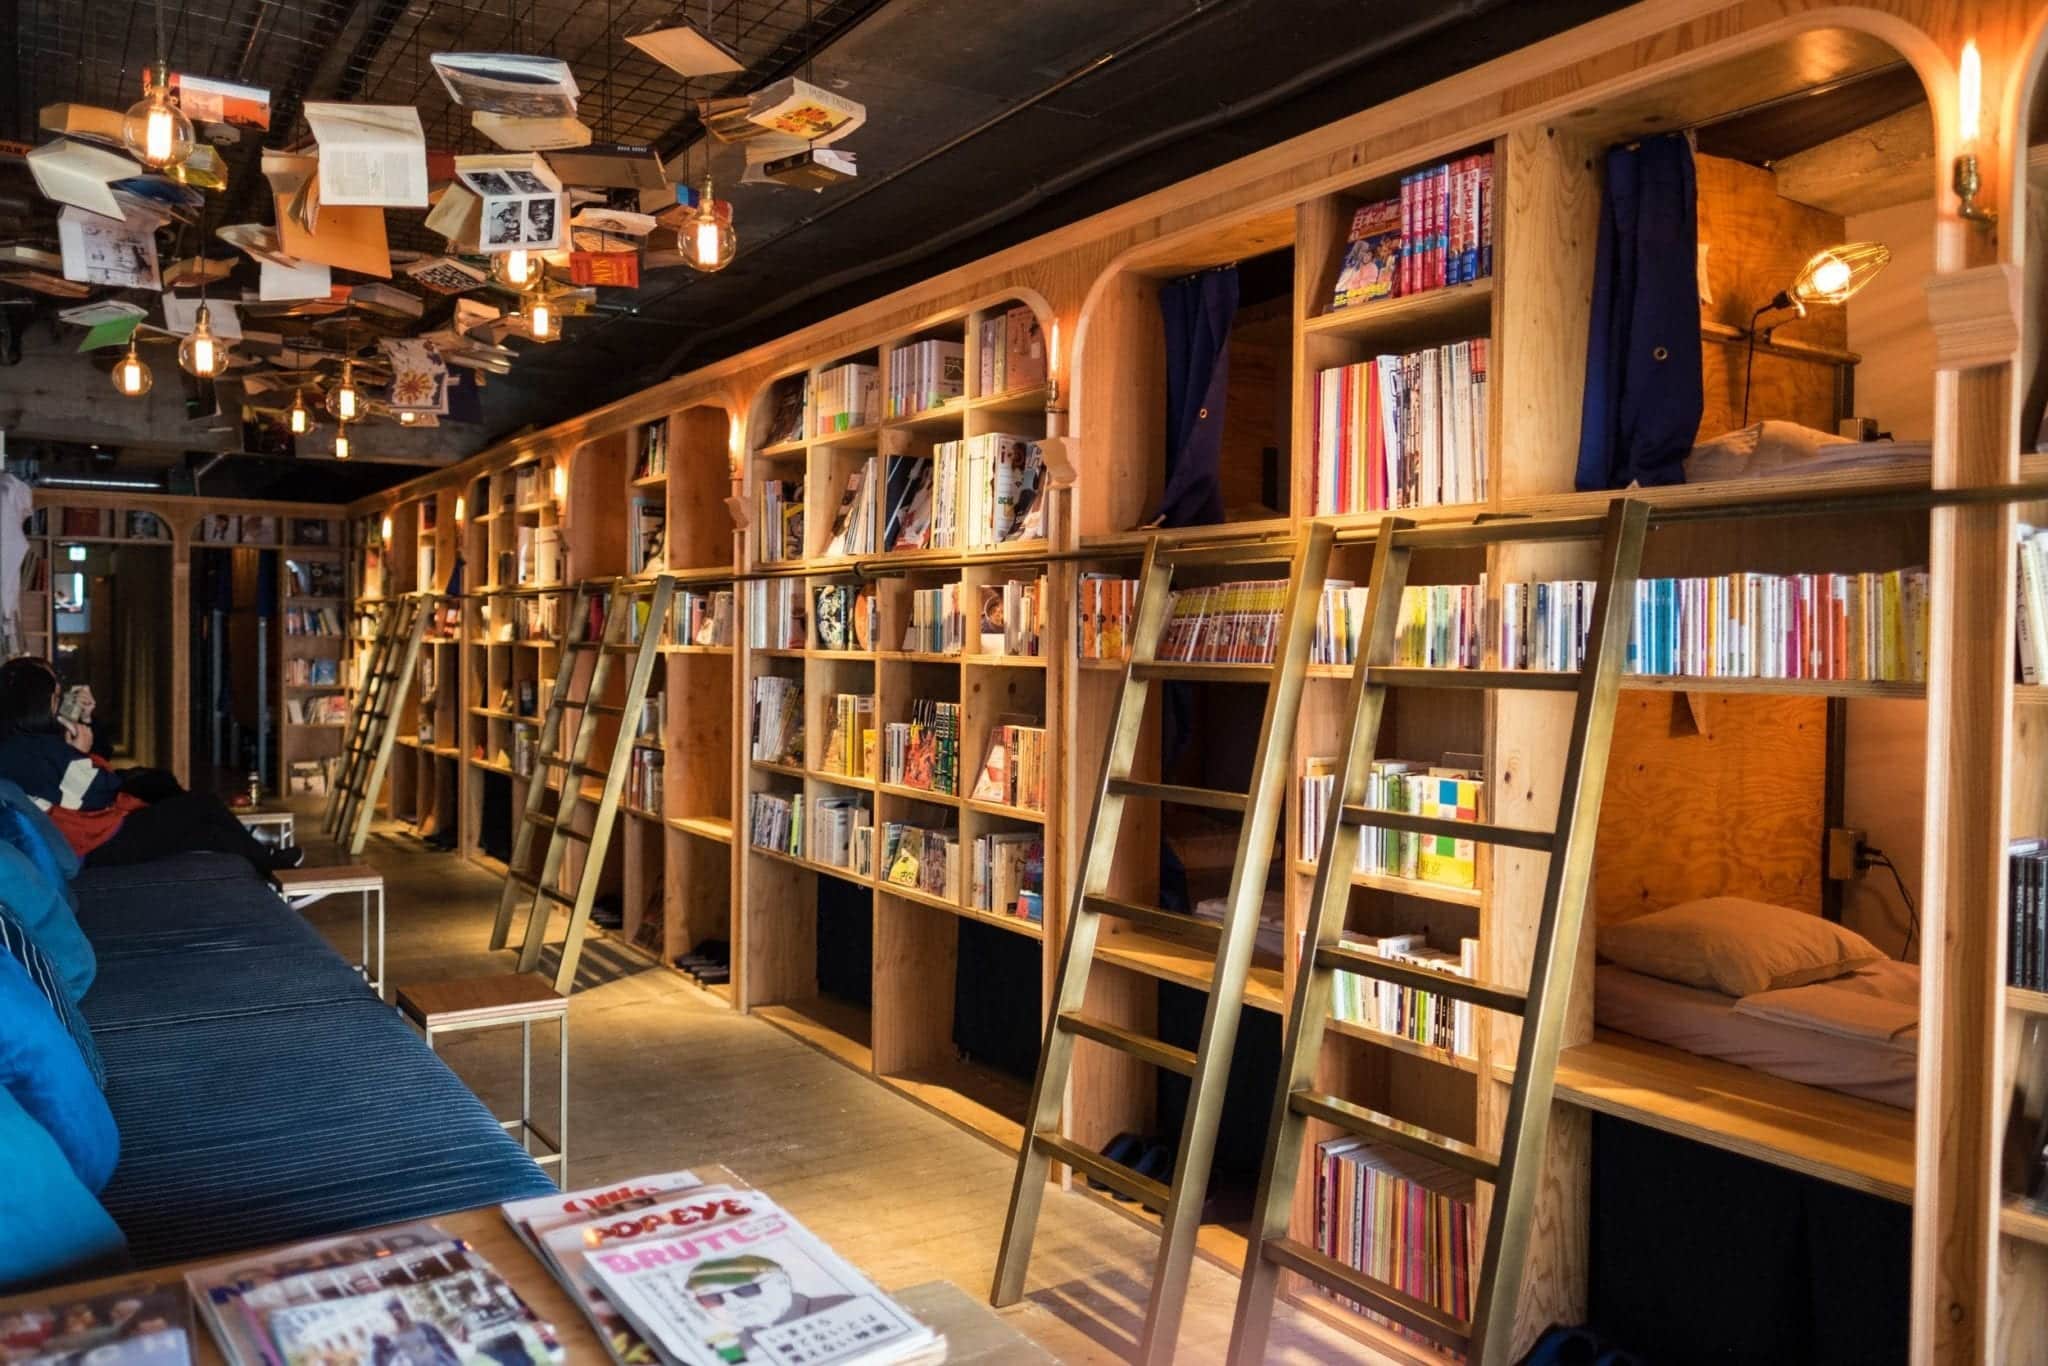
I swore off hostel dorms for good when I was 30. I just can’t deal with the noise, smells, and inconsiderate roommates who sleep through their alarms. But a capsule hotel like this? With semi-private rooms? In the polite society that is Japan? I’ll give it a hard maybe.

Afterward, we headed to Racines Farm to Park for some blueberry grilled cheeses. (Strange, but I think I’ve gotten more commentary on the blueberry grilled cheeses than anything else I did on this trip!)

Park Hyatt Tokyo

On the way back, I fulfilled a long-held travel dream by staying at the Park Hyatt Tokyo, the Lost in Translation hotel. I partnered with the hotel for this stay — in exchange for coverage, they offered me one comped night and additional remaining nights at a discounted media rate that totaled around $500 with taxes, plus free spa access and breakfast — so I decided to book two nights. $500 for a single night is way beyond my usual price range (even if it was more like $250 per night with the comped night), but for this hotel, it was absolutely worth it.

Honestly, this is the only place I ever want to stay in Tokyo. It was like living in a dream, where every service was brought to me as soon as I thought of it. My room on the 48th floor had an incredible view over Tokyo, especially during a purple sunset. The concierge called all over Ginza to find places where I could bring sealed custard mochi home. The pool was a peaceful place for a morning plunge, and the spa had a Japanese onsen, of course.

And that bar? Oh, that bar. It was exactly like the movie, down to the jazz band and the incredible floor-to-ceiling views over Tokyo. The bar’s full name is the New York Bar and my friend Annette and I indulged in several New York-themed cocktails. My favorite was the Radio City, made with Grey Goose Earl Grey, pink pepper syrup, and soda.

Bird Land

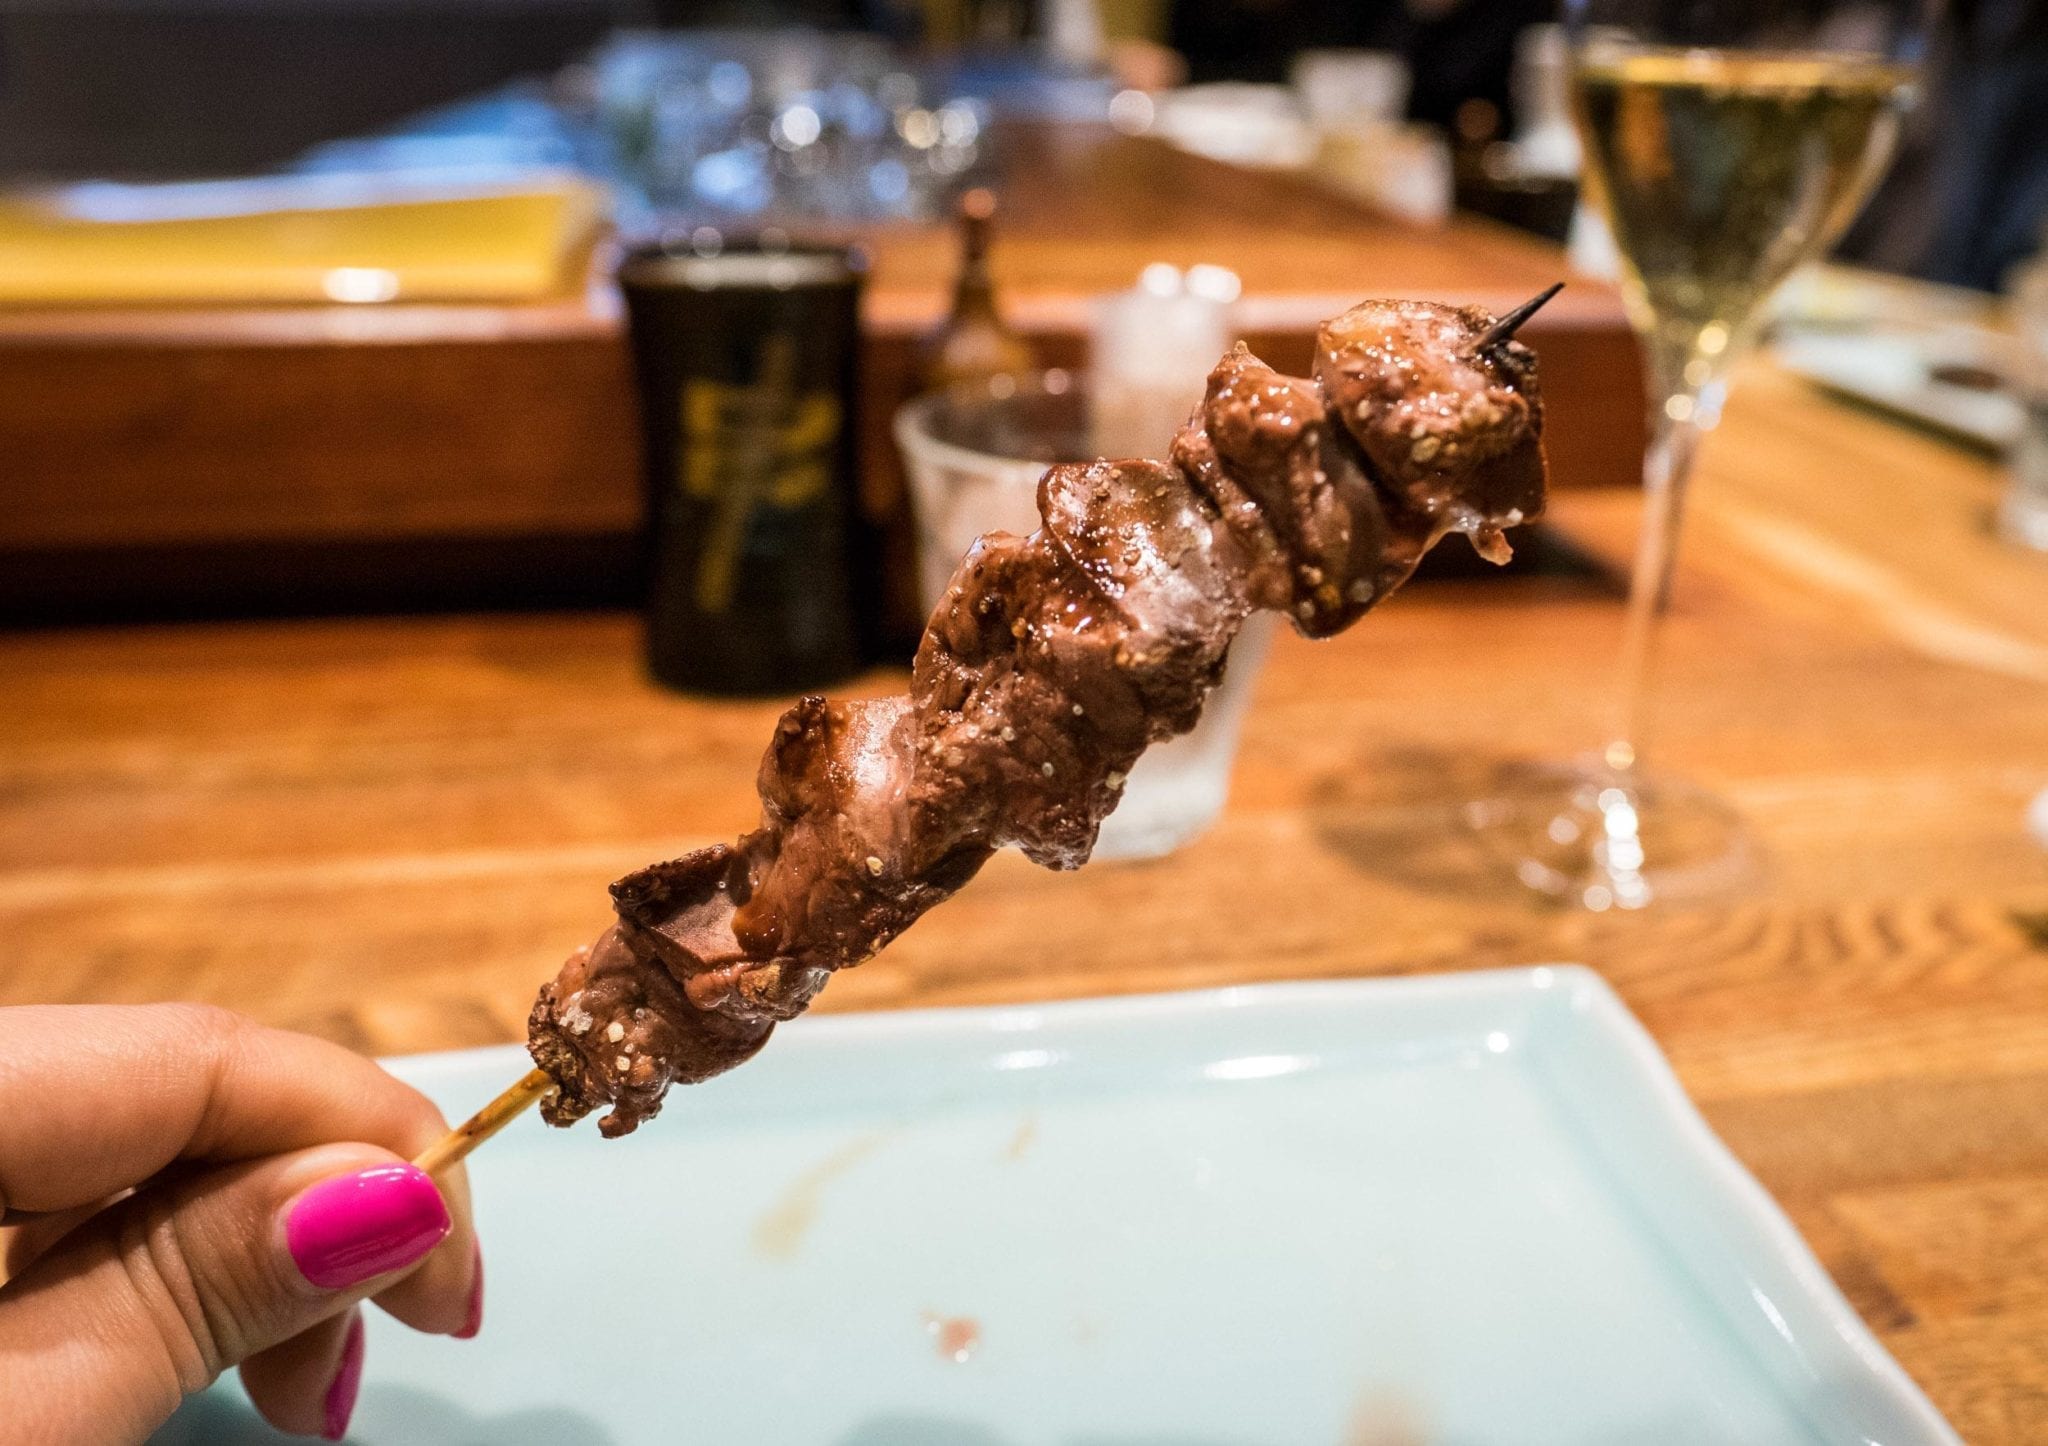
And finally, on Valentine’s Day, I took myself out for the ultimate romantic meal for one. Yakitori is meat on a stick, usually washed down with a beer in a smoky bar. Bird Land made headlines for being the first yakitori restaurant to earn a Michelin star. (Or in my mind, the most affordable way to eat at a place with a Michelin star.)

Bird Land has several tasting menus available. I opted for the smallest tasting menu because I didn’t feel that hungry, but I do feel like I missed out on some interesting dishes. One by one, the skewers were brought out. Chicken with green onions and sea salt — the best chicken ever. Chicken livers. Cabbage with butter and truffle oil. Mushrooms. Spiced ground chicken in egg yolk sauce. Before dessert was served, the waiter offered me a chance to try anything else, and at his recommendation, I ordered some chicken skin. Crispy and delicious!

Note: don’t just type “Bird Land” into Google Maps — they only show one location, in Marounuchi, not the Ginza place where I had booked my reservation. They were very understanding and let me stay.

The Tokyo Takeaway

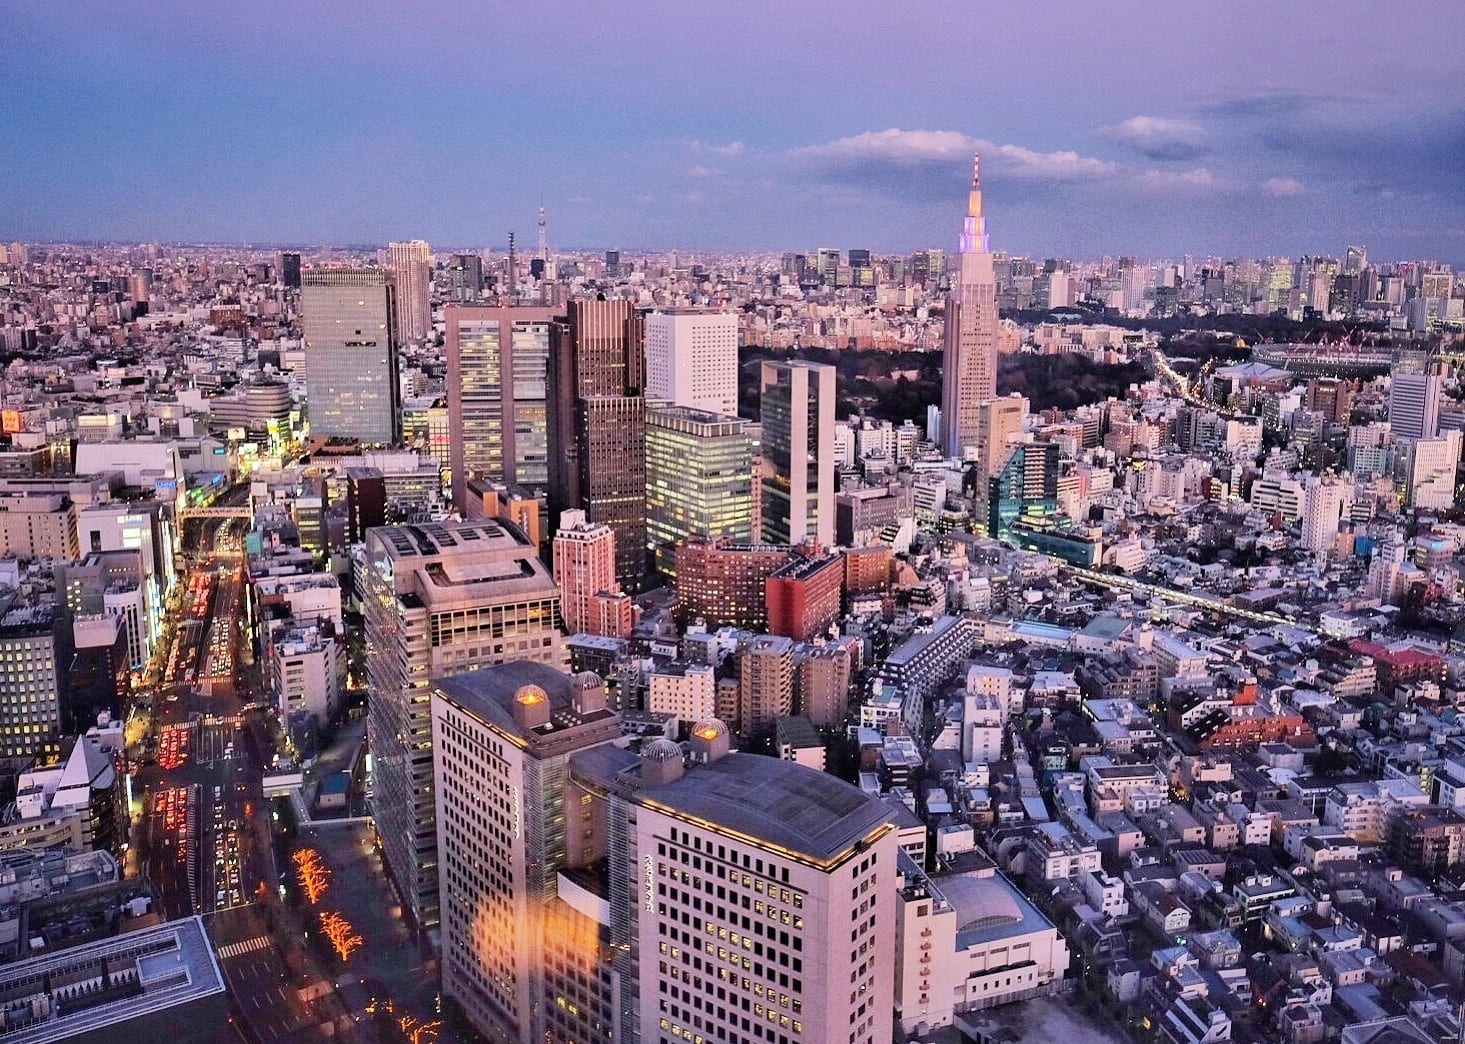
Tokyo has now earned a place among my favorite cities in the world! Even though I just got back, I would so love to return to Tokyo and just hang out. I feel like I have a bit of ownership of the city now.

In retrospect, I wish I hadn’t planned a return to Kyoto and Osaka on this trip — I felt like my second visit to those cities was a letdown. But spending a full week in Tokyo wouldn’t have been a waste of time; even after a jam-packed month, you’ve only scraped Tokyo’s surface.

I ended my trip with a lovely surprise — it may have taken 14 hours to fly from JFK to Narita with ANA, but on the way back, the flight was two hours shorter and departing from the much closer Haneda Airport, which saved me about three hours. In short, I went door to door, from the Park Hyatt Tokyo to my apartment in Harlem, including an hourlong shuttle from the hotel to Haneda and an hourlong Uber from JFK to my apartment, in less than 17 hours. If you can fly into Haneda Airport instead of Narita, do it. It saves you so much time!


READ MORE: What’s It Like to Travel in Japan?


Essential Info: In Tokyo I stayed at two different hotels: first the Hotel & Spa J-Mex Tokyo in Shinjuku, which turned out to be a love hotel (!). Of course I accidentally booked myself into a love hotel!! That said, the staff were lovely and gave me privacy, my suite was massive and comfortable, and it was just a short walk from Golden Gai. Rates from $176.

Next up was the Park Hyatt Tokyo, which was fantastic start to finish, a true luxury experience, with some of the most spectacular views in town. I loved my suite, the pool, the spa area, and the incredible service. Rates from $616.

Hiro’s Ginza Personal Shopping Experience costs $72 on Airbnb. Tell him the kind of things you’d like to shop for before your visit and he’ll pick out some special spots for you.

Ninja Food Tours operates a variety of food tours in Tokyo, Kyoto and Osaka. I loved my Tsukiji Market Tour and it costs 8,500 yen + 8% tax ($86 total). There are discounts for booking multiple tours.

The Tokyo Book and Bed has several locations; we visited the one in Ikebukuro. Overnight rates start at 3,800 yen ($36) for compact beds and 4,800 yen ($45) for standard beds; you can also visit during the day like we did for 500 yen ($5) per person per hour.

Bird Land‘s tasting menus start at 6,300 yen ($59), and you can always order dishes a la carte.

Even though Japan is a very safe country, be sure to purchase travel insurance before your trip. I use and recommend World Nomads for trips to Japan.

This campaign was brought to you by ANA — All Nippon Airways, who covered the expenses of three days in Tokyo as well as all my time in Hokkaido. I extended my time in Japan an additional five days at my own expense. I had full freedom to do anything I wanted, and all vendors were all paid in full except the Park Hyatt Tokyo, who offered me one comped night and one night at a media rate of $500 including spa access and breakfast, plus they kindly picked up my and Annette’s bar tab. All opinions, as always, are my own. 

Have you been to Tokyo? How did you like it?

The post Splurging on the Right Things in Tokyo appeared first on Adventurous Kate.


from Adventurous Kate https://ift.tt/2pS2K5G

Meijer LPGA Classic Tickets On Sale Now

Meijer LPGA Classic Tickets On Sale Now Tickets to the 2018 Meijer LPGA Classic for ... Read more.

The post Meijer LPGA Classic Tickets On Sale Now appeared first on GolfBlogger Golf Blog.


from GolfBlogger Golf Blog https://ift.tt/2IiFhC5

Friday Fitness Roundup #FitnessFriday

Here are a few relevant fitness and health stories that I ran across this week: ... Read more.

The post Friday Fitness Roundup #FitnessFriday appeared first on GolfBlogger Golf Blog.


from GolfBlogger Golf Blog https://ift.tt/2GoeUKy

Golf Bathroom Mat

Golf Bathroom Mat Ridiculous Golf Item Of The Week

The post Golf Bathroom Mat appeared first on GolfBlogger Golf Blog.


from GolfBlogger Golf Blog https://ift.tt/2GW4cvI

Thursday, March 29, 2018

Devyn Chatman Fundraiser Golf Outing

Devyn Chatman is a senior at John Glenn High School — the school where I ... Read more.

The post Devyn Chatman Fundraiser Golf Outing appeared first on GolfBlogger Golf Blog.


from GolfBlogger Golf Blog https://ift.tt/2pQazIL

Trials And Fredulations

Top portion of the morning to you!

Sorry for my absence yesterday, I was engaged in mind-numbing tedium:


If you think that riding an exotic handmade bicycle for hours on end on a Wednesday and stopping for a light farm-to-table lunch before heading back home is something I enjoy doing then, well, obviously you're right.  Still, it's my responsibility as a semi-professional blogger to put this artisanal Fred crucifix through its paces, and that's exactly what I plan to do.

Speaking of the Renovo, I happened to read recently that they're receiving an investment from a wealthy Texan:


"As a longtime cyclist, I'd been following Renovo for several years and was blown away by the size of their operation, their technology, and of course, the performance of their bikes," Spinks said. "I immediately made the decision to invest upon seeing their state-of-the-art machines, tools and configurations in-process and watching their new designs come to fruition. And with this production-bike capability boost, our partnership becomes even more exciting and rewarding."


Al Spinks is an author, speaker, proven leader, entrepreneur, Silver Fox Advisor & life/performance coach. While serving as an enlisted man aboard nuclear submarines in the US Navy, he was selected to take part in a leadership program where he earned a B.S. degree (Aerospace engineering, University of Texas, Austin) and was promoted to the rank of 2nd Lt. (USMC). He then qualified as a Naval Aviator (NFO) and flew in high performance, tactical jets (EA-6A) from the decks of 4 aircraft carriers.

If so I'm pretty sure he was one of Etheline Tenenbaum's suitors in "The Royal Tenenbaums:"


Also--and I swear on my chamois Renovo has not asked me to share any of this, I've merely been stumbling upon this stuff in the normal course of my Internet usage--here's a video about Renovo's "SuperBikeBox:"

As I believe I mentioned when I took delivery of the bike, this was by far the best-packed bicycle I've ever received.  I believe I also mentioned that I had no idea the box became a stand so I basically ripped it to shreds with a box cutter and then put the bike together on the floor.  So watching this video now makes me feel like a total idiot.

On the other hand, having destroyed the box means I can't return the bike, so who's the idot now?

Lastly, here's the Outside column about self-driving cars you knew had to be coming:


Even before the technology claimed its first victim last week I've wondered why the hell any cyclist would trust an industry that's turned much of the country into this:


But then again America loves a lying boyfriend.


from Bike Snob NYC https://ift.tt/2IgqHv1

Golf In Augusta — In 1899

Even before Bobby Jones selected the Fruitland Nursery for his Augusta National Golf Course, the ... Read more.

The post Golf In Augusta — In 1899 appeared first on GolfBlogger Golf Blog.


from GolfBlogger Golf Blog https://ift.tt/2E4jf3x

How I Shoot & Edit My Instagram Photos

How I Shoot & Edit My Instagram Photos

I’m a photographer, I love photography and I love my trusty DSLR camera (this is the equipment I use). At the same time, I’m also obsessed with iPhone photography, especially for Instagram.

I’ve realized there’s something just so relatable and tangible about smartphone photos which feeds on Instagram’s purpose: connection. Photos taken on an iPhone have a special “I feel like I was there” mood and vibe to them, which Instagram was made for.

More than ever, I think Instagram is favoring the more intimate and raw and real moments versus the shiny perfect professional images (this is my observation). Occasionally I will sprinkle in photos I’ve taken on my big girl camera on my Instagram feed, but lately, I’ve just been really loving the magic of the 7 plus.

It’s also a good reminder that in order to have a successful brand and business, you don’t need to get too fancy on social media. It’s about how you make your people FEEL. So don’t use having no fancy equipment as an excuse to not start.

The reason I want to share this blog post is because one of the questions I get asked the most is how do I edit my photos. I’m not secretive about anything to do with creativity or business. One of my favorite aspects of this business is the teaching and sharing element. I’ve learned so much from other people and my own research and it just feels silly not to share!

How to Take a Good Photo with Your iPhone: the Basics

1.) Find the best natural light

If there’s one thing any good photographer will tell you, it’s that light is everything. Especially when it comes to the iPhone where you have less control, lighting is key. The best light is generally about 1-2 hours after the sunrise and 1-2 hours before sunset.

If you’re inside, find your way to the window, that’s where you’ll get the best light indoors.

Try to avoid taking photos in the middle of the day outside. There’s gonna be some gnarly shadows that are flattering for no one. The only shots that can work this time of day are cute outfits if you’re posed in front of a very clean simple background. Even then, it will look better a couple hours later.

My favorite photo taking weather is when it’s cloudy and overcast. The clouds act as an amazing light diffuser which is super flattering for skin especially. Or if it’s golden hour aka the hour before sunset.

2.) Clean Your Lens

OMGOSH this drives me up the goddamn wall when I see a blurry, dirty looking pic. Your phone goes everywhere with you so naturally, the lens is going to get dirty or fingerprints on it. Before you go to take a photo, always make sure to clean off the lens with your tee shirt or something really soft.

If you’re extra like me, you’ll carry around a microfiber cloth specifically for lenses but that’s a little extra and a t-shirt will get you there most of the time.

3.) Focus & Exposure

With an iPhone, all the settings are automatic so no need to adjust for aperture or shutter speed. The key to getting a properly exposed photo with your iPhone is to make sure you tap on the subject to ensure they are properly exposed and in focus.

I know this sounds kind of obvious to anyone who’s used the iPhone camera but it’s too key to not include. If you’re having someone else take your picture make sure to ask them to get you in focus.

4.) For the best selfies (when you don’t have an instagram husband)

I love this hack. People ask me a lot how I get pics of myself. When he’s around, my amazing fiancé is the best instagram husband-to-be, but most of the time I am home alone.

When that’s the case I use my favorite hack: the self-timer

Use the self-timer on the front-facing camera and prop the phone up on a nearby table at the right hight. You might have to prop it on some books, a water bottle. Get creative.

Make sure to pick your favorite from the burst, or your phone will get SO full so quickly because each self-timer photo takes a 10-shot burst.

I’ve also learned how to not really give a fuck when I’m taking pictures in public. This is a practice and an art. It can be kind of embarrassing to pose with your latte in a crowded street. Sometimes you have the make the judgment call that it isn’t appropriate, but most of the time no one really cares. You know how it goes, the haters will always hate.

And yes, I’ve totally asked strangers to take my photo. Some come out better than others 😉

How I Edit To Create a Cohesive Instagram Feed

1.) Prioritize A Few Colors on Your Feed

The feeds I love following and the ones I see growing are the ones that have a distinct and consistent look. There’s not right or wrong color, the key is to choose the ones you love and stick with them.

I recommend choosing 2-4 colors to use on a regular basis and stay consistent (you’re going to get sick of me saying that, which means I’ve only barely emphasized it enough).

2.) How to choose colors:

What Colors Are You Already Using?

Consider the colors you already use a lot in your brand. Look at your logo and website for some inspiration. If you don’t love the colors associated with your brand maybe that’s a sign you’re ready for a refresh. You want to be able to create a strong color association with your work across platforms and Instagram is a great place to really nail that home.

What is your daily environment like?

If you live in Miami bright vibrant colors will be a breeze. Do you live in New England? Maybe you want a more neutral palate. I use a lot of blues because well, I live on an island.

What colors do you love? aka – what colors won’t you get sick of?

For me, one thing that always stays true is my deep love for green.

If you’re someone who has a wardrobe of neutrals, maybe magenta isn’t going to really suit your instagram feed.

The Apps I use to Edit My Instagram

Snapseed

To make any light/clarity/color adjustments I use snapseed.

Snapseed also has a great tool called selective. You can pinpoint one color or one area on a photo to edit which is amazing. The brush tool is also great for getting rid of any colors you don’t want.

VSCO

I use VSCO to get a signature filter look.

I recommend you find 1 filter and stick with it. This will help you in a big way to create that consistent cohesive look that you want.

The app is free but I recommend you buy some of the filter packs to get the right look. I love the A’s.

You can also create an editing “recipe” in VSCO so you apply the same effects to every photo. I think this is awesome and will save you so much time.

My Personal Editing Recipe

  • Use the J5 filter at +7
  • Add contrast +2
  • Sharpen +3
  • Temperature -1
  • Finally, in Instagram use the filter Ludwig at 10-20 %

With every image, I can kind of tweak things differently depending on what I’m working with but that’s just a common example

I also love the A Color Story App and Afterlight apps

My favorite scheduling app: Later

I use Later to schedule my instagram posts which is great because it saves me stress the day of posting. I create the photo and caption ahead of time and you can preview to see how everything flows in your feed.

It’s good to mix of darks and light, busy and simple compositions so everything looks like it flows.

That is how I get a consistent cohesive instagram feed. There are so many tools out there. It can be overwhelming to find a style but know that it’s better to choose something and work with it than sit on the sidelines.

If you want more blogging tips you can sign up for my blogger exclusive newsletter.

Connect with me on instagram @init4thelongrunblog

The post How I Shoot & Edit My Instagram Photos appeared first on In it for the Long Run.


from In it for the Long Run https://ift.tt/2E27avK